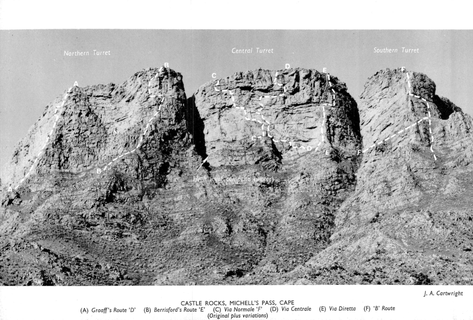
description
The lower portion of the face of the Central Turret is clearly divided into three sections by two distinct ribs of rock. The rib on the left is short, an 8o-foot pillar that forms the start of the Via Normale: while that on the right, considerably higher, constitutes the major sections of the Via Diretta. Between them lies an amphitheatre of smooth, light-grey slabs sweeping up to merge eventually into the red overhangs beneath the summit. This is the start of the Via Centrale. The beacon that marks the foot of the first pitch will be found approximately 100 feet to the right of some large blocks leaning against the face at the base of the amphitheatre, almost directly below the prominent grey rib that provides the key to the final sections through the overhangs.
40 feet 'B': Climb diagonally left up a short crack and sloping face to a narrow, horizontal ledge cutting right across the amphitheatre.
70 feet 'D': Walk left along this ledge until it peters out. A further is-foot dassie traverse, step-down and climbing traverse, where the horizontal slit is blocked, leads to the continuation of the ledge.
3o feet 'D': The ledge ends 6o feet to the left beneath an obvious recess. Move diagonally left into the recess and tip a short chimney to another broad ledge. Walk 200 feet to the left to the base of a steep, lichen-covered face immediately to the right of the So-foot pillar on the Via Normale.
120 feet 'F': The Lichen Face. Climb the recessed corner next to the pillar for 25 feet before working diagonally right and up the grey, lichen-covered face to a band of small over- hangs on the same level as the top of the pillar. Continue straight up over a loose block inserted in the face and up a rather scruffy face to a small stance.
20 feet 'D': Easier rock to the left leads to the bottom of a 60-foot ramp sloping diagonally up to the right just above a large tree. Scramble to the top of the ramp.
30 feet 'E sup.': A short vertical face is ascended on the right of the ramp to the level of a thin traverse leading back to the left. Traverse eight feet to the left on small grips, climb up 4 feet, and then descend diagonally to the left behind packed blocks to a narrow ledge. As an alternative, it is also possible to climb directly on to the ledge from the ramp by mean of a small fault to the left.
40 feet 'C': Scramble diagonally to the left up a series of short steps to another similar ledge. An old abseil piton of ours serves as an excellent belay for the next pitch.
25 feet 'E sup.': Near the left-hand extremity of the ledge, an awkward crack gives access to a one-man stance directly below the overhang.
6o feet 'F sup.': The overhangs stretch out a long way on either side of the stance, but by traversing 30 feet to the left it is possible to outflank them. It is advisable to place a running-belay after the initial 8-foot hand traverse as no other resting place is available until the end of the traverse has been reached. Once reached, however, good handholds make the pull-up on to the face above quite easy. By working diagonally to the right again one emerges on a comfortable platform from which direct contact can be made with climbers on the previous stance.
35 feet 'F inf.': Move up to the smooth face on the right of the stance, over sonic loose blocks, to a high handrail that enables one to traverse left for about 12 feet before descending diagonally left to a narrow ledge beneath another large overhang.
6o feet 'F': Traverse to the left around the corner, move up six feet, and then continue diagonally to the left up the short, vertical face above. A final delicate move past a loose block lands one on a small stance in a shallow recess.
6o feet 'E sup.': Climb the white face on the left of the recess for 15 feet. Now traverse to the right back into the recess and step across and around the corner on small grips to an easy face which leads to a ledge broad enough to accommodate the entire party. This is the continuation of the 'lunch ledge'.
35 feet 'E sup.': Step off the flake on the left of the ledge and climb diagonally left for six feet before working back to a one-man stance 10 feet beneath the overhangs and slightly to the right of the start of the pitch.
70 feet 'E': This is the first pitch along the Traverse of the Eagles. Continue traversing to the right for approximately 45 feet to a large detached flake on a level with the foot rail. Using this flake, step on to the face and mantelshelf up to the continuation of the traverse six feet above the flake to the right.
50 feet 'E inf.': Traverse further to the right over slabs. Near the end of the pitch climb up six feet to an uncomfortable sloping stance.
70 feet 'F': This is the last pitch on the Traverse of the Eagles. Another 35 to 40 feet of traversing on the same level brings one to the base of a short, overhanging recess. Climb the recess and around the small nose. Descend diagonally right to a narrow ledge with a loose block on one side.
50 feet 'F and A2': Ten feet to the right of the stance move up six feet to a sloping ledge (artificial, i piton). A delicate traverse to the right lands one at the base of a smooth recess capped by a series of small overhangs. By climbing straight up the recess to the second overhang, one can escape to the right on to a narrow catwalk sloping diagonally up to the right (artificial, 6 pitons). Move around the corner to the right and climb up a few feet to a narrow, two-foot wide ledge.
70 feet 'F and A2': The Yellow Recess. Traverse to the right into the base of a 45-ft recessed corner closed in at the top by a large overhang. Ten feet of free climbing leads to the first bulge, which is climbed mechanically (artificial, 3 pitons) before moving up another 10 feet to a straddle position beneath the second bulge. Now continue up to the roof and then traverse out to the left under the overhang for 15 feet (artificial, 12 pitons). Exit on to a narrow ledge on the same level as the overhang. Six feet to the left it broadens to form a more comfortable stance.
35 feet 'D': Climb eight feet up the side of the triangular flake overlooking the stance and descend the other side. Traverse 20 feet further to the left.
60 feet 'E sup.': Move 20 feet diagonally to the left up a lichen-covered face to a short, grass traverse beneath a projecting nose. A series of strenuous layback movements up the vertical crack in a bulging face complete the pitch.
45 feet 'D': The shallow, bushy gully on the left is climbed to a stance at the foot of a narrow chimney behind a huge block.
15 feet 'D': Climb through the chimney to the top of the block and scramble to the summit where a beacon will be found.
Route history
| 1960 | First ascent: |
|---|
Warnings
Location
- Lat/Lon: -33.40663, 19.30577
Grade citation
| 18 | Assigned grade |
| ★Scurvy |
Accommodations nearby more Hide
Share this
Photos Browse all photos

★ Via Centrale 18 - via-centrale-bulge-pitch-drawing.png

★ Via Centrale 18 - MCSA Journal No 063 - 1960-via-central-eagles-traverse.png
Get a detailed insight with a timeline showing
- Ticks by climbers like you
- Discussions of the community
- Updates to the index by our users
- and many more things.
Login to see the timeline!