Aiuto

The Gap 🚫

  • Contesto grado: AU
  • Ascensioni: 15

Le arrampicate in questa area sono vietate/illegali.

Stagionalità

G
F
M
A
M
G
L
A
S
O
N
D

Sommario

Amazing rock architecture, but because of suicides, police get called if anyone sees you climbing there. The hidden routes around Dueling biceps are pretty safe from prying eyes and deserve to be more

Descrizione

Climbing is banned in this area - motion activated cameras will automatically call police.

Limitazioni per l'accesso

Climbing is banned in this area - motion activated cameras will automatically call police.

Avvicinamento

Climbing is banned in this area - motion activated cameras will automatically call police.

Tags

Vie

Aggiungi via Aggiungi scheda Riordina Modifica in blocco Converti gradi
Grado Via
Chiusa

Start in the little corner past arete, 40m right of CoB. Not accessible in big seas. easily seen from the south.

  1. 20m (24) Up the corner, head right (manky BRs) then through roof and up wall. Continue past small ledge (manky BR) to large ledge.

  2. 35m (20) Walk 4m left then climb diagonally left and up to top.

FA: Michael Law, 1978

Chiusa

Classic bridging corner in middle of steep wall facing the lookouts. SOme old bolts but good natural gear.

  1. 30m (21) A hard but well protected crux to get established in the corner (2 good BRs). Cruise up the steep corner to a small belay stance.

  2. 12m Either continue up the line (loose), or traverse right around the arete and up the short wall (no pro).

FA: Michael Law, 1976

Chiusa

15m left of CoB.

  1. 15m (22) Up flake and wall then head left, up and back right to the belay.

  2. 30m (23) Head right to roof then up to flake. Follow flake left to a stance, then move right and up a variety of cracks to the top. Take a large cam.

FA: Michael Law, 1978

Chiusa

Start under roofed corner, 5m left of SG.

  1. 15m Up corner (manky BRs) then traverse left under the roof to a crack. Follow this (getting harder) then belay on the right (BBs).

  2. 20m (24) Head 4m right to arete. Up this then move left to crack. Up the wall, through a bulge (BR) to belay below roof.

  3. 10m Follow the jam crack left through the roof.

FA: Michael Law, 1981

Chiusa

3m left of JC, at the base of the abseil. Up (BR) to corner. Traverse left around arete (BR) then up the wall above (BR).

FA: Glenn Robbins, 1980

The small southern cove, located about 100m south of the main wall (separated from it by a small buttress). It's possible to walk around underneath the buttress, but you stand a good chance of getting wet. It's better to jump the fence at the look out, walk 5m right (facing out) to a large bolt. Carefully solo down the corner below this to a large ledge with a rap station. It's a good idea to leave the rap rope in place here as well.

Chiusa

Start below a thin crack 2m left of the right arete of the cove. Up (manky BR) to gain the crack. Follow this for 2m then move right to the arete and up.

FA: Michael Law, 1978

Chiusa

4m left of S. Up the blank corner.

FA: Giles Bradbury, 1980

Chiusa

4m left of SWD on boulder.

  1. 15m (20) Strenuously up to ledge at 5m. Follow low traverse line right to arete. Rap off, or

  2. 10m (19) Continue up the slopey corner above (no pro).

FA: giles Bradbury, 1980

Chiusa

Start as for ST.

  1. 25m (20) Follow the gutter left.

  2. 25m (20) Head diagonally up and left.

FA: Glenn Robbins, 1980

Chiusa

At the buttress above the keyhole. The keyhole is almost directly below the Dunbar's anchor. Up for 4m then move right to the line that goes through the rooves and on to the top.

FA: Warwick Baird, 1980

Chiusa

This and the next climb T are accessed either by walking around through the keyhole (only when the swell is small and the tide is out), or by rapping all the way down Poet's Corner. Escape Climb 25m 15 The corner, about 10m left of LJC. Scary

FA: Michael Law, 1976

Chiusa

Further left and loose

Chiusa

To find this short classic, walk right (south) along the fence until an orange corner comes up close to the fence. Rap down. ★★ Poet's Corner 10m 21 X Up the corner (2 manky BRs). Recommended top rope only.

FA: Michael Law, 1976

Chiusa

As for PC. A mammoth leftwards traverse that finishes at the base of Why Me. It's the longest climb in Sydney, and almost certainly unrepeated, so race down there now to bag the coveted second ascent!!

Chiusa

Scarier than many routes twice the grade. Big roof down left of poet's Corner. Scramble down about 12m right (south) of PC. Rap down a small corner then tension right under the big roof (difficult) to a hanging belay (very manky BBs).

Huge roof with crazy moves. Take a #9 hex. Up and through roof to ledge (big exposure). Head up and right (BR) to arete then up. Reasonable pro but crazy!

FA: Michael Law, 1978

An impressive area offering a fine set of hideous cranks. To find this area, continue south for about 100m past 'Poet's Corner', until you can see an impressive undercut wall, just south of a big zawn (about 80m south of where you are standing). 'Dueling Biceps' and 'Fat Action' are located about 20m south again, on a smooth brown wall with a 10m slab at the top. This is also where the rap station is located (3 BBs), at the southern end (towards the right, facing out) of the slabs. A 35m rap will deposit you on the initial belay ledge for DB and FA, or you can rap in another 10m then swing right to access the other climbs.

Chiusa

Just left of the arete, about 8m right of FF. ABout 30m R of the abseil.

  1. 20m (23) Up and right (BR) then up and left (BR) to flake. Continue up to rounded hold (BR) then head diagonally right (BRs) to crack. Up to ledge.

  2. 20m (25) Right out roof then left over bulge and continue left (stance). Blast over roof and up wall above to belay in V corner (BBs and cams).

  3. 20m (21) Head diagonally right to slabby corner (as for FF).

FA: Michael Law & giles bradbury, 1983

Chiusa

The second pitch is a sweet traverse along the lip of a roof. 9m right of LGM, below big corner.

  1. 25m (20) Follow the corner straight up then step right to belay as for WM P1.

  2. 20m (24) Move up to traverse line, then an excellent and pants filling traverse left (6 manky BRs). Step down to double bolt belay. Possible to rap off from here.

  3. 20m (22) Move 2m left and punch through roof (BR - hard to clip). Head 4m right along traverse line then move up (BR) and right to belay at far left hand end of ledge (double BBs).

  4. 30m (16) Dangerous. Head up (rust stain that might have once been a BR) past ledge to corner. Follow to top.

FA: Michael Law & giles bradbury, 1980

Chiusa

Variant second pitch to B. Follow the lower traverse line (BR then cams) to belay as for B P2. Much safer than any of the pitches on B.

FA: Giles Bradbury, 1980

Chiusa
  1. 25m (27) Up Boyzone corner for 10m then step left (BR). Through roof to flake (BR) then up to break. Move right and up to roof (BR), then launch out big roof to BR on lip. Continue up to belay on BRs on B P2.

  2. 20m (27) Over rooves and up (BRs and a large cam) to belay on ledge as for B P3.

  3. 30m As for B P4.

FA: Michael Law & giles bradbury, 1985

Chiusa

1m right of D. An old Giles Bradbury project (so it must be pretty bloody hard!).

Chiusa

20m right of FA at brown slime. Blast straight up the wall (BRs and small to mid size cams) to belay as for B P2. Rap off, or finish up B.

FA: Michael Law, 1984

Chiusa

great climbing, needs a rebolt and the horizontal shattered pillar reinforced or removed. Start at the ledge at the bottom of the abseil a few meters R of Duelling Biceps. Up to BR, then move right and crank straight up wall (BRs).

FA: Stuart Macelroy, 1989

Chiusa

Don't do it

FA: Michael Law & Nic Collier, 1984

Chiusa

From the top of the corner on P2, move R 2m and through roof

FA: Michael Law, 1984

Chiusa

Hornby lighthouse to Jacob's Ladder

Fairly difficult and extremely illegal section of the traverse. It begins at the military air base with a committing grade 18 traverse and a 27m abseil. Once the rope is pulled on this rap, the only way out is forward. Very low tides and swell are required along with difficult free climbing and even an archway to crawl through that gets flooded on every wave. Given the almost certain chance of an un-warented rescue being called on your behalf, its not worth attempting this part without certainty of success. When done with swims on a freakishly calm day this is quite a reasonable exercise, as only a handful of gaps require roping up.

From the North: Starting at Watsons bay, walk and scramble south to reach the gaza strip. And unless you've previously explored this traverse in detail, leave a rap rope fixed and collect it later. You’ll be surprised at just how perfect the conditions must be to get around this part of the cliffline. The scramble starts out with some tricky wet bouldering sections before requiring you to rock hop and wade for a sort section. If the swell is too high and you have to stay high on the cliffline here, there's no point continuing as it becomes more and more condition dependant the further you go. Once around this crux, there's an easy 500m or so of rock hoping and cave scrambling. About 200m before turning the corner on The Gap main wall, there is a tricky and dangerous wet boulder problem move (can be protected with gear), followed by some more tricky and exposed climbing. The chossy band of rock 30m off the deck is the best way through, goes fairly easily at about grade 16 M0 on terrible gear or maybe 23 if you were to free the last moves. A 27m rap gets you to the ground and some hurried scurrying to get around The Gap corner. Once inside The Gap, the back inlet/stream can be crossed/ at low tide and the keyhole on its southern corner can be squeezed though also. If you’re in any doubt as to what conditions are required to send this part of the traverse, have a peak at the keyhole from the railing at The gap, It is “Just” visible if you crane your neck nearby the lowest part of the lookout system. Once through the Keyhole, the first bail option on this section appears as “Escape Climb” (15). To continue the traverse, the big zawn must be climbed to gain dulling biceps area. This wet horizontal pumpfest has been done by Mikl and co in the 80's. Roughly 40m of climbing up to grade 22, worth pitching up to save decking on the submurged boulders. From dulling biceps it’s an easy (at low swell) scramble around to Jacob's Ladder where this section of the traverse finishes.

FA: 18 Set 2022

Selected Guidebooks more Nascondi

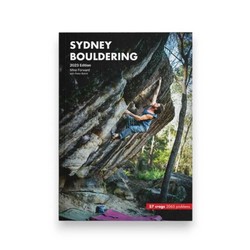
Autore/i: Mike Forward and Peter Balint

Data: 2023

With 2065 bouldering problems ranging from V0-V15 across 57 areas nestled around Sydney, the all new Sydney Bouldering Guide will keep you occupied for years to come. Just because we live in Sydney we'll try not to be biased but honestly this city has some amazing bouldering and usually not more than a few minutes off the road or some even near parks and train stations. There's no need to camp out and trek for hours to get to world class problems, they're right on your door step.

Authors Mike Forward and Peter Balint spent over 7 years putting this guide together and is the first new bouldering guide for Sydney in over 20 years. It's over 350 colour pages including 600+ colour photo tops, crag tops, amazing images and more.

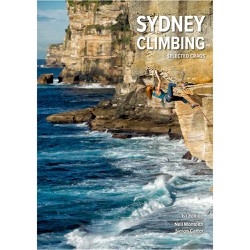
Autore/i: Neil Monteith & Simon Carter

Data: 2021

ISBN: 9780645299908

Featuring 1142 climbing routes located at 24 of the best crags in the Sydney area, this A5 size guide book is super user friendly with easy to use colour cliff topos and access maps. Covers sport and trad climbing at a variety of grades, something for everyone.

Alloggi in zona more Nascondi

Condividi questo

Gio 25 Mag
Controlla cosa succede a The Gap.

Get a detailed insight with a timeline showing

  • Ticks by climbers like you
  • Discussions of the community
  • Updates to the index by our users
  • and many more things.

Login to see the timeline!

Deutsch English Español Français Italiano 한국어 Português 中文