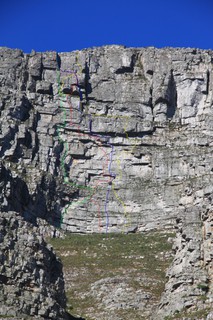
A Crag Guide gives an extensive view of all sub areas and climbs at a point in the index. It shows a snapshot of the index heirachy, up to 300 climbs (or areas) on a single web page. It shows selected comments climbers have made on a recently submitted ascent.
At a minor crag level this should be suitable for printing and taking with you on a climbing trip as an adjunct to your guidebook.
This guide was generated anonymously. Login to show your logged ascents against each route.
| Route | Grade | Style | | Selected ascents |
|
|
| 2 | |
Quiver Crag
[12] 14m [12] 8m [12] 11m [14] 18m [11]
FA: J. Davies & C. Marks, 1947
| 14
| Trad 51m, 5
| |
|
| 3 | |
★★★ Magnetic Wall
The first pitch described hereunder starts about three meters to the right of the crack pitch of 'Quiver Crag'.
[F A2] 27m
Climb a slight crack in a white face using four pegs. Continue up free to an overhang above. Move to the right and up to a stance. [F A2] 20m
A chimney-like crack on the left is climbed to an overhang. Follow a crack to the left and upwards around the block then reach for the top of the block. [E] 10m
Walk clockwise around a big block and ascend a chimney to a stance on the right. [19] 37m
Climb up 2m and traverse to the right to a corner. Continue to the right for about 2m. The pitch goes virtually straight up from this point. A resting point will be found 8m above, slightly on the left, followed by a crack to another resting point a further 10m above. Climb the face above using layback holds to a ledge. Ascend from the right of this ledge.
FA: M Scott, D Hartley, T Hughes & J Levy, 1971
| 19
| Trad
| |
|
| 4 | |
★★ Magnetic Wall-Direct
[22] [18] [22] [19]
FA: G. Paterson-Jones & Hilton Davies, 12 Oct 2014
| 22
| Trad 4
| |
|
| 5 | |
★★ Victims of Comfort
| 29
| Trad 25m
| |
|
| 6 | |
★★ Quake
[21] 18m [19] 30m [23] 30m
FA: T. Versfeld, L. Rust & Dirk Versfeld, 1999
| 23
| Trad 78m, 3
| |
|
| 7 | |
★★★ Touch and Go
[17] 17m [16] 20m [20] 10m [16] 30m
FA: B. Fletcher, P. Williams & P. White, 1961
| 20
| Trad 77m, 4
| |
|
| 8 | |
★★★ Double Direct
[17] 35m [19] 40m
| 19
| Trad 75m, 2
| |
|
| 9 | |
★ Metal Fatigue
[20] 30m [19] 18m
FA: G. Robbins & D. Bottomley, 1985
| 20
| Trad 48m, 2
| |
|
| 10 | |
★★ Cloud Surfing
A sustained route with a bit of spice. The second pitch is great with a wild finish!
Start by the tree at the right end of the little ledge as for the direct start to 'Touch and Go'.
[23/24] 20m
Start up the crack system until the large projecting disc-shaped flake ~5m up. Traverse right ~3m to a good flat jug below a large undercling feature. Pull through the steep bulge here, and up the face above to a vague rail (tricky, but essential gear). Continue up and right (sparse pro) on edges to better holds. Carry on up to a narrow ledge. Walk ~3m right and up to a stance on a neat ledge, directly below the thin crack line (of Farewell to Arms) higher up on the wall above. [22/23] 25m
Scramble up to the face, which is climbed directly (one good small wire) to the base of the thin Farewell to Arms crack. Follow the crack, but where Farewell to Arms traverses right under the roof, pull through to the wide, jagged crack above. Follow this to the higher roof and traverse ~1m left. Blast straight through the last roof where there is an intermittent finger rail (below and right of Touch and Go). Crank through to the face above, step right and then up to the right side of the Touch and Go stance. [24?] 20m
Head up and right to the break on the right side of the first narrow roof above the stance (shared with Farewell to Arms). Pull through and climb up. At the next narrow roof to the left take a step down and left to gain the rail under the roof. Traverse left ~4m to where the rail widens, and there is a large rock wedged flush with the back of the rail. At this point, the rock above the roof is mottled grey, and a bit left of the smoother, yellow/brown rock on the right. Pull through the roof here to a thin rail with key slots for micro cams. Make a hard move up and left to establish on the face which is followed up and slightly left (sparse pro) to reach good holds. Continue straight up the blocky bulges above to the wide ledge.
Note: Other than the sections shared with Farewell to Arms, some sections of these pitches may well have been done before, but all the crux sections are new to the best of our knowledge. The result is a bit of a hybrid route that offers a fairly demanding line up the wall. Consensus grading is needed. Pitch 3 may be harder for shorter folks.
FA: Richard Halsey & M. Penso, Apr 2018
| 24
| Trad 65m, 3
| |
|
| 11 | |
★★★ TATWOC
Acronym: Tired And Totally Wanked Out Climbers
[23] 20m [23] 20m [21] 25m [25] 25m
FA: Charles Edelstein, T. Dick, T. Versfeld, B. Daniel, A. Roff, D. Vallet, R. Breyer & Willem le Roux, 2008
| 25
| Trad 90m, 4
| |
|
| 12 | |
★★★ TATWOC-Direct
Acronym: Tired And Totally Wanked Out Climbers
[23] 20m [23] 20m [21] 25m [26] 20m
| 26
| Trad 85m, 4
| |
|
| 13 | |
★★★ Tweedle Dee and Tweedle Dumb
[23] 15m [21] 25m [21] 25m
FA: L. Rust & T. Versfeld, 2001
| 23
| Trad 65m, 3
| |
|
| 14 | |
★★ Lluvia Rosada
A direct line, with some steep and exposed sections. The crux requires wide stemming, faith in rubber, finger tendons and a modicum of commitment. The long 23 pitch is excellent and could form a link-up with the overhanging crack on Arms Race for a straight, consistent voyage up the wall.
Start as for Arms Race.
[18] 15m
At the right end of the ledge, head up the bulging base of the crack, but then move right for ~2m and easily up to a short, wide crack (just right of the usual approach pitch for Arms Race). Stance below and right of a smooth, bottomless corner (which just below and left of the Arms Race overhanging crack. [26+?] 15m
Looks improbable and is pretty desperate. Climb up into the short, undercut corner capped by a roof. A very thin rail (which takes narrow micro cams and small offset wires) heads out left under the roof. Traverse left under the roof (crux) until able to pull onto the face. Continue straight up on layaways edges (there is one slot for a bomber small wire) followed by lovely, but slightly run out, face climbing to the ledge. Move up and slightly right to stance at the small platform at the base of the Farewell to Arms recess. Consensus grading needed - might be a grade or two harder. Would be an impressive onsight. [23] 30m
Start up the recess and after a few meters move onto the right wall at good series of finger rails. About 1m before the rails head around onto the nose (as for Tweedle Dee and Tweedle Dum, is a steep layback crack. Follow this via some powerful moves and then slightly left up the steep, exposed prow to a wide break. Continue up and slightly right to the narrow roof at a point below the seam above (this seam eventually joins the top section of Touch and Go final pitch). Pull through the roof (good gear at the lip) and take the seam up to a cubby hole at the base of the knobbly groove. [17] 15m
Step left onto the face and climb in the centre of it until a finger about halfway up (where the holds above become very smooth and rounded). Traverse slightly left until left hand can use the side of the narrow chimney to the left. Head up, step back right onto the face and up to a small ledge. Then straight to the top between some boulders to stance under the left end of the overhang above.
Note: For the crux pitch you only need micro/small cams and small wires. You will not need anything bigger than a red alien/#4 Wallnut even for the stance.
FA: Richard Halsey & S. Cunnane, Apr 2018
| 26
| Trad 75m, 4
| |
|
| 15 | |
★★★ Arms Race
[23] 25m [21] 25m [22] 30m
FA: E. February, A. de Klerk & G. Lacey, 1982
| 23
| Trad 80m, 3
| |
|
| 16 | |
★★★ Arms Race Direct
[25] 20m [21] 25m [22] 30m
FA: D. Steyn & Willem le Roux, 2010
| 25
| Trad 75m, 3
| |
|
| 17 | |
★★ Armadura
A short, fiery crux leads to easier climbing in an exposed position.
Start on the platform below the nose that forms Arms Race pitch 2. Approach from the Dream Ledge via the first pitch of Cableway Crag or Farewell to Arms.
[25/26?] 15m
Scramble up onto the large block at the base of the large wide corner, the left side of which is the opposite side of the nose that Arms Race pitch 2 uses. From standing on the block, there are a series of underclings, the highest ones take micro cams. Pull onto the face and move up and slightly left via a series of technical and tenuous moves to gain good holds ~1m below the roof. Traverse ~1.5m left to a little platform past the left end of the roof above. Follow the featured face above for ~5m then tend right to a little stance is above the starting block, and ~5m directly below the break in the roof above (followed by Arms Race pitch 3). Consensus grading is needed. [20?] 35m
Climb up the large features and slightly right to the wide crack through the roof. Follow this as for Arms Race and at the first rail, traverse ~2.5m left and head up to the white face to an alcove below the knobbly, vegetated groove (stance on Lluvia Rosada). Step right and follow the face just to the right of the groove, and through a steep blocky section to finish on the wide ledge below the overhang.
FA: Richard Halsey & T. Iliev, Apr 2018
| 26
| Trad 50m, 2
| |
|
|
Ledge located on the Cableway Wall, adjacent to Cobblestone Gendarme
|
| 19 | |
★★★ Cableway Crag
[13] 12m [7] 11m [11] 15m [16] 25m [16] 22m
FA: M. Mamacos & C. Butler, 1949
| 16
| Trad 85m, 5
| |
|
| 20 | |
★★★ Farewell to Arms
[19] 20m [21] 20m [21] 10m [21] 25m
FA: A. Davies & D. Cheesmond, 1978
| 21
| Trad 75m, 4
| |
|
| 21 | |
★★★ Space Race
Start:
The route is in The Dream sector on Fountain Ledge, Table Mountain. Space Race is very direct and goes through one of the biggest flat roofs on the mountain. The first pitch starts between Farewell to Arms and Last Tango.
[23 A3] 30m
On The Dream Ledge between 'Farewell to Arms' and Last Tango is a steep white wall capped by a huge roof. Start up the wall left of centre, a few metres from the thin crack of Farewell to Arms. Head directly up to the huge rail then traverse right to get to the thin seam that intermittently heads out to the lip of the roof. Using tiny cams, RPs and knife blades climb the 10m roof and turn the lip. Freestyle a couple of metres to a good stance under overhangs. A nice free variation involves railing rightwards under the huge roof and then coming back left above the roof to the stance. [22] 30m
Head up on the left and turn the overhangs. Head straight up the centre of the clean white wall between Last Tango on the left and The Cruise which heads up the leaning break on the right. Arrive at a big ledge and do a tricky mantelshelf. [21 R] 12m
After a bit of easy ground, there is a blank slab above. A ripple runs up the slab leaning to the left. Climb this ripple without protection. At the rail, head left and up the overhanging pillar, the slab is quite a serious lead. [21] 20m
Above is a wide roof with one obvious break some metres to the left. Don’t go there. Go slightly right and in the roof find a small pocket that allows you to lean out to the lip. Crank up onto the face and go to the arête on the right. Head straight up.
FA: Hilton Davies & G. Paterson-Jones, 2012
| 23 PROT:R
| Trad 92m, 4
| |
|
| 22 | |
★★ Last Tango
[20] 25m [16] 17m [19] 14m
FA: P. Anderson & R. Smithers, 1973
| 20
| Trad 56m, 3
| |
|
| 23 | |
★★★ Triple Indirect
[20] 25m [16] 17m [21] 25m [19] 35m
FA: Charles Edelstein & K. Smith, 1978
| 21
| Trad 100m, 4
| |
|
| 24 | |
★★ The Cruise
[20] 25m [21] 35m
FA: D. Davies & J. Fisher, 1986
| 21
| Trad 60m, 2
| |
|
| 25 | |
Last Cruise
A nice link-up, that potentially has some new climbing.
[21]
Start up Last Tango but keep straight to join REM. Pull into the step, bottomless corner and up to the highest overlap and rail 1m right to a stance on a narrow ledge (Essentially the Wet Dreams pitch 2) [21]
Step left from the stance and through the break (shared with REM) but then head left and up to a rail. Traverse further left and then up to the next rail. Continue a little further left climb up a vague seam arcing to the left (and below the left end of the narrow roof a few meters higher). Climb up passing the roof on its left side to join The Cruise and follow this to the top.
FA: Richard Halsey & J. Wakeling, Oct 2018
| 21
| Trad 60m, 2
| |
|
| 26 | |
★★★ REM
[23] 20m [21] 20m [21] 25m
FFA: L. Rust & D. Turnbull, 1998
FA: L. Rust & R. Suter, 1998
| 23
| Trad 65m, 3
| |
|
| 27 | |
★★★ The Dream
[19] 20m [21] 40m
FA: D. Davies, D. Kelfkins & G. Lacey, 1979
| 21
| Trad 60m, 2
| |
|
| 28 | |
Sweet Dreams
Start: The prominent feature of the Cobblestones Gendarme is the huge overhang and chamber beneath it. The left end of the huge overhang drops a plumbline to Fountain Ledge where La Vida (and Sweet Dreams) starts up the clean arete.
[19] 12m
Use small vertical cracks slightly left of the arete to get established, then move onto the arete and head straight up to a ledge. Cobblestone Chamber is up on the right [21] 17m
Climb the short face above to a ledge and continue up the arete-which is under-protected - to a recess. (A grey Alien or equivalent Metolius master cam is critical placed in a slot on the right). The arete start can be avoided by walking left 3m and climbing the under-clings up and right to reach the recess. Continue up to the jumbo ledge above at the base of "The Dream" and "Last Tango". Walk left 7m. [21] 10m
Start as for Last Tango and do the crux. Continue up the easier ground diagonally left heading for the right-facing corner. Traverse right at the base of the corner to do a layback move into the deep recess at the end of "The Dream" first pitch. Move right by railing on the outside or dassie crawl to the stance at the start of the second pitch of "The Dream". [22] 30m
Climb the second pitch of "The Dream". [14] 20m or [22X]
Move Left 3m and climb the easy arete (or climb directly up the unprotected face for 5m) to scrambling ground and stance on a ledge system that takes you to the abseil chains or to the top out pitch. [18] 20m
Move 15m left on the ledge system under the overhang to an obvious break in the roof. Climb this starting with a strenuous cranking to easier ground and continue to the top, or traverse 60m left to the Magnetic Wall abseil station.
FA: Charles Edelstein & R. Breyer, 2010
| 22
| Trad 110m, 6
| |
|
| 29 | |
Wet Dream
Start: The prominent feature of the Cobblestones Gendarme is the huge overhang and chamber beneath it. The left end of the huge overhang drops a plumbline to Fountain Ledge where La Vida (and Sweet Dreams) starts up the clean arete.
[19] 12m
Use small vertical cracks slightly left of the arete to get established, then move onto the arete and head straight up to a ledge. Cobblestone Chamber is up on the right [21] 17m
Climb the short face above to a ledge and continue up the arete-which is under-protected - to a recess. (A grey Alien or equivalent Metolius master cam is critical placed in a slot on the right). The arete start can be avoided by walking left 3m and climbing the under-clings up and right to reach the recess. Continue up to the jumbo ledge above at the base of "The Dream" and "Last Tango". Walk left 7m. [21] 10m
Start as for Last Tango and do the crux. Continue up the easier ground diagonally left heading for the right-facing corner. Traverse right at the base of the corner to do a layback move into the deep recess at the end of "The Dream" first pitch. Move right by railing on the outside or dassie crawl to the stance at the start of the second pitch of "The Dream". [22+] 30m
Climb straight through the roof on REM and higher up pull through the overlap 2m left of the crux of the dream. [14] 20m or [22X]
Move Left 3m and climb the easy arete (or climb directly up the unprotected face for 5m) to scrambling ground and stance on a ledge system that takes you to the abseil chains or to the top out pitch. [18] 20m
Move 15m left on the ledge system under the overhang to an obvious break in the roof. Climb this starting with a strenuous cranking to easier ground and continue to the top, or traverse 60m left to the Magnetic Wall abseil station.
FA: Charles Edelstein & R. Breyer, 2010
| 23
| Trad 110m, 6
| |
|
| 30 | |
★★★ The Wake-up
[23] 30m [21] 30m
FA: T. Dick & T. Versfeld, 2004
| 23
| Trad 60m, 2
| |
|
|
|
| 32 | |
★★ Gang Plank
FA: G. Athiros & M. Scott, 1964
| 17
| Trad
| |
|
| 33 | |
★ French Connection
[17] 12m [17] 15m [19] 12m [14] 12m [19] 20m [12] 5m
FA: D. Trousseau, P. de Tolly, M. Scott & A. Wood, 1984
| 19
| Trad 76m
| |
|
| 34 | |
★★ La Vida
Start: The prominent feature of the Cobblestones Gendarme is the huge overhang and chamber beneath it. The left end of the huge overhang drops a plumbline to Fountain Ledge where La Vida starts up the clean arete.
[18] 12m
Use small vertical cracks slightly left of the arete to get established, then move onto the arete and head straight up to a ledge. Scramble 10m to the right to a big clean ledge with two knee-high blocks on it. At this point, you are looking up at a clean white wall just below and right of the chamber. [21] 17m
Step off the larger block onto the wall and make cruxy layaways to get to the horizontal crack that leads to the chamber. This is the "dassie ledge" used by Cobblestones. Head up and left on the steep headwall to reach a large ledge with a recess. [19] 10m
From the back of the recess move up and left to get through the overhang using the first notch. French Connection continues left to use the second notch. Holy Mackerel heads up the large crack in the back of the recess. Once established on the face above head up directly to the next ledge to belay here. The section above leads to the top of a free-standing pillar which is avoided. Walk left around the corner and into the gap behind the pillar to belay on the big chockstone. [18] 8m
Head up the clean arete on the left to a platform that is the top of the second free-standing pillar. [20] 30m
Step across onto the face to gain the block on the left. Head up and left on the steep white wall. Move left below the expanding flakes to avoid them. Move up to gain the steep grey face. Head slightly right and up to the top of the wall. NOTE: The original ascent climbed the expanding flakes at grade 22. This variation is not recommended due to the fact that gear and handholds are reliant on the creaking flakes.
Scramble to the top or traverse 100m left to the Magnetic Wall abseil station.
FA: B. Daniel & Hilton Davies, 2009
| 21
| Trad 77m, 5
| |
|
| 35 | |
★★★ Holy Mackerel
Start 10m left of 'Cobblestone Face'
- [12] 12m:
- Climb straight up through the broken-up face to a substantial ledge directly below a cave.
- [14] 12m:
- Move 8m right, and continue to a restricted ledge partly composed of bollards. The route follows a deep, vertical crack leading into a cave-like recess under a triangular overhang. At this point move out right 1-2m in order to continue up the fault which now breaks through the triangular overhang.
- [14] 16m:
- A little distance above, there is a shallow cave containing several large, jagged boulder formations. Climb the vertical fault running through this to a broad ledge. Alternatively, move to the left and then climb up for 3m before moving to the right to the same finish.
- [14] 10m:
- In order to reach the platform on the free-standing pinnacle, which is a feature of this part of the mountain, climb the pleasant 4m face with small Cederberg-like grips. This pitch is adjacent to 'Avalanche Crag'.
- [14] 10m:
- Cross the chasm between the free-standing pinnacle and the mountain, and climb the cleft on the right, i.e. the nearest one to 'Staircase' which leads to the top of the Cobblestones Gendarme.
- [17] 12m:
- The pitch which is strenuous for 3m, runs straight up the face immediately above. Climb up and pull through the overlap, move left and up a shallow, vertical recess for 1-2m before moving right on flange-type grips for about 1m then continue up to the broad ledge above. 'Cobblestone Face' also finishes on this ledge.
Scramble to the summit
FA: R. Baillie, H. Hill & R. Reinicke, 1964
| 17
| Trad 62m, 5
| |
|
| 36 | |
★ Cobblestone Face
- Hiking Approach:
- The routes start up a small corner that faces Cape Town and is next (by a few meters) to the Fountain Ledge path, a short distance before the path swings sharply left to the scramble which leads to the upper ledge.
- [10] 10m:
- Step off a block and climb up the knobbly corner to a ledge.
- [10] 10m:
- Climb the next small face and traverse (Dassie crawl) left into a chamber under a large overhang. Note, the Dassie crawl starts just after passing the 'Holy Mackerel' layback crack which is capped by a triangular roof.
- [10] 14m:
- Climb up the sloping block and squirm about 2m under the roof keeping left until you come out the other side. Sling a small protruding horn to prevent the rope getting stuck. Stand up awkwardly on the small ledge and climb the easy crack to the broad ledge above. Communication is difficult at this stage due to the followers being inside the cave below.
- [11] 15m:
- Move left to twin cracks. Climb the left-hand one for about 5-6m and then move our right for 3m and continue up to a ledge at the base of the "Gendarme" (pinnacle).
- [10] 10m:
- Climb to the top of the "Gendarme".
- [12] 15m:
- Step across onto the face and traverse right, around the corner. Move up to the bottom of an exposed crack which is followed to a fair ledge.
Scramble to the summit.
FA: C. Campbell & W. Cobern, 1917
| 12
| Trad 74m, 6
| |
|
| 37 | |
★★ Avalanche Crag
[12] 12m [13] 18m [14] 22m [14] 9m [12] 12m [13] 12m [16] 23m
FA: I. Allie, N. Garret & A. Gruft, 1954
| 16
| Trad 110m, 7
| |
|
|
|
| 39 | |
Companionway
FA: W. Clake, M. Cappel, J. Coulter, H. Graafland, R. Murcott, L. Israelski, G. Kaye, G. Streeter, L. Thomas & J. Williamson, 1957
| 14
| Trad
| |
|
| 40 | |
★★★ Jacob's Ladder
After scrambling up to the staircase ledge (grade 10 scramble), walk left all the way to the end of the ledge to a grey face. Climb up to a standing up exposed, but easy, traverse to the left and around the corner to a half tree (it used to be a big tree but someone cut it and left only the tree trunk). Start climbing from there.
[16] 25m
Climb straight up the flaky wall to a ledge. Go up to the start of a flaky crack system (the start is awkward) and follow this system, which goes slightly diagonally left, to the end of it. Step right to the face and up till able to reach a wide rail (there are two small rails just above it). Build a hanging belay here. [16] 25m
Climb the stunning traverse until forced to move up. Climb straight up to a flaky steep crack system to a small ledge with a big hole on it. Belay from this ledge. [16] 20m
Start at the far left of the small ledge climbing straight up on good holds the steep wall to a bulging face. Move slightly right and up into a wide but short crack to a huge ledge. Build your anchor here. Scrambling leads to the top.
FA: C.C Butler, H. Davis, J.E. Henry, M.P. Mamacos & G.W. Rose, 1953
| 16
| Trad 70m, 3
| |
|
| 41 | |
★★ The King Slayer
Climbs the committing steep arête feature below the Roulette ledge.
Start as for 'The Squid and the Whale-Original'.
| 27
| Trad 20m
| |
|
| 42 | |
★★★ The Squid and the Whale-Direct
One of the harder routes on the Ledge. Sustained and a touch exciting.
Start: Start on the staircase ledge about 5m to the right of the arête between 'Jeopardy' and 'Jacob's Ladder'
[31] 40m
Scramble up the large layback seam for about 10 meters to a ledge. Climb up the centre of the overhanging face through a series of small roofs to the 'Roulette' rail. Plenty of smallish cams are useful to protect this bottom section. Resisting the temptation to sit on the 'Roulette' ledge, rail right for 1m, pull through the roof and climb directly up the face just right of the main arete to join the original line at the 'Captain Hook' rail. Figure out a cunning way to get down and to retrieve your gear or join the final pitch of Roulette.
Rail right for 1m, pull through the roof and climb directly up the face just right of the main arete to join the original line at the hook rail.
| 31
| Trad 40m
| |
|
| 43 | |
★★★ The Squid and the Whale-Original
One of the harder routes on the Ledge. Sustained and a touch exciting.
Start: Start on the staircase ledge about 5m to the right of the arête between 'Jeopardy' and 'Jacob's Ladder'
[31] 40m
Scramble up the large layback seam for about 10 meters to a ledge. Climb up the centre of the overhanging face through a series of small roofs to the 'Roulette' rail. Plenty of smallish cams are useful to protect this bottom section. Resisting the temptation to sit on the 'Roulette' ledge, rail right 2m and gain the next rail using the vertical crack. From this position, pull straight through the next little roof via difficult moves to establish in some underclings. Climb past a peg and move diagonally left past the crux of 'Jeopardy' to 2 more pegs and the 'Captain Hook' rail (the end of 'Jeopardy'). Lace the rail with cams and climb the blunt arête. Pull straight through the next roof and exit out left onto jugs on the headwall. Figure out a cunning way to get down and to retrieve your gear or join the final pitch of Roulette.
| 31
| Trad 40m
| |
|
| 44 | |
★★★ Jeopardy
| 29
| Trad 35m
| |
|
| 45 | |
★★★ Double Jeopardy
Start as for 'Jeopardy'
| 30
| Trad 45m
| |
|
| 46 | |
★★★ Triple Jeopardy
Start as for 'Roulette Arête'.
| 31
| Trad 40m
| |
|
| 47 | |
★★★ The Last of the Mohawks
Start as for 'The Squid and the Whale-Original'
| 32
| Trad 40m
| |
|
| 48 | |
Russian Roulette
Left of 'Roulette'
| 30/31 PROT:R
| Trad 40m
| |
|
| 49 | |
★★ Roulette Arête
[25] 20m [22 A2] 10m [19] 35m
FA: Hilton Davies & G. Paterson-Jones, 2012
| 25
| Trad 65m, 3
| |
|
| 50 | |
★★★ Roulette
FA: A Barley, R Barley, D Hartley & M Scott, 1969
| 21
| Trad 120m, 5
| |
|
| 51 | |
Fountain Roof Traverse
Take the first 4 pitches of 'Roulette' until the roof. Pull onto the face and traverse right on the lip of the roof until the overhang below your feet ends, and then straight up the wall above (to the left of the top pitch of 'Myrrh').
| 24/25
| Trad
| |
|
| 52 | |
★★ Captain Hook
- [16] 35m
- ???
- [23] 12m
- ???
- [20] 25m
- ???
- [11] 20m
- ???
FA: P Andersen & J Knight, 1972
FFA: D. Kelfkins & A. de Klerk, 1982
| 23
| Trad 82m, 4
| |
|
| 53 | |
★★ Myrrh
- [16] 35m
- ???
- [22] 36m
- ???
FFA: G. Morton
FA: R. Baillie, B. Cliff, D. Good & M. Mamacos, 1962
| 22
| Trad 91m, 3
| |
|
| 54 | |
★★★ Mary Poppins and Her Great Umbrella
- [16] 35m
- ???
- [32] 15m
- ???
| 32
| Trad 50m, 2
| |
|
| 55 | |
★★★ Mary Poppins and Her Great Umbrella-Variation
- [16] 35m
- ???
- [34] 15m
- ???
| 34
| TradProject 50m, 2
| |
|
| 56 | |
★★ Staircase
Starts on the staircase ledge -- look for an obvious zigzag crack.
- [12] 17m
- Climb a short slab to a chimney, then up the chimney. Part way, either step left then up a stepped cracked, or continue up the chimney. Belay on the obvious ledge in an alcove.
- [12] 24m
- Traverse right, past a wide-step continue traversing around the corner, continue traversing past bolted anchors to belay behind a large boulder.
- [13] 18m
- At the left end of the boulder, climb a jagged right leaning crack/weakness into a chimney than past a small roof to a ledge.
Continue right through a keyhole and scramble to the top.
FA: J. Darrol & V. Jachens, 1922
| 13
| Trad 59m, 3
| |
|
| 57 | |
★★★ Haggai
Start 2m right of 'Staircase'
- [20] 20m
- ???
- [17] 15m
- ???
- [20] 20m
- ???
FA: A. de Klerk & A. Wood, 1982
| 20
| Trad 55m, 3
| |
|
| 58 | |
★★★ Escalator
7m right of 'Staircase'
- [17] 23m
- ???
- [14] 23m
- ???
- [16] 28m
- ???
FA: B. Fletcher, N. Gilliat, C. Hankey, I. Perez & L. Thomas, 1957
| 17
| Trad 74m, 3
| |
|
| 59 | |
★★★ Elevator
| 17
| Trad 90m, 3
| |
|
| 60 | |
★★★ Boulder Highway
- [23] 12m
- ???
- [15] 30m
- ???
- [22] 35m
- ???
| 23
| Trad 77m, 3
| |
|
| 61 | |
★★★ Cool Cat
- [24] 17m ???
| 24
| Trad 17m
| |
|
| 62 | |
★★★ Pilgrim's Progress
Start: Right of 'Cool Cat', below the Elevator Roof.
- [22] 15m
- Move up to the rail under the big roof. Rail strenuously left to the narrow ledge at the point where 'Cool Cat' pulls through the roof.
- [15] 20m
- Climb the wall to the cave at the start of the Staircase traverse.
- [20] 20m
- Climb the Aretḗ above the right hand side of the cave, moving right and finally joining the original last pitch of 'Myrrh'.
- [19] 30m
- From a few meters up the gully, traverse out left onto the steep wall. Climb the center of the wall to the top.
FA: A. Forsyth & R. Smithers, 1980
| 22
| Trad 85m, 4
| |
|
| 63 | |
★★★ Scaredy Cat
| 25
| Trad 20m
| |
|
| 64 | |
★★★ Cats
Start: This climb is on 'Fountain Ledge', Table Mountain. The most notable nearby feature is the enormous roof of 'Elevator' about 20m up. Directly below the enormous roof is a big free-standing pillar. Scramble up behind the big pillar for 8m and then walk 10m along a ledge to the left to just beyond the Elevator roof.
[24] 16m
At the point where the ledge does a sharp right turn, the ledge becomes flat and broad, and there is a smaller ledge a metre higher. Step up onto the higher ledge and climb the shallow recess to the roof. Micro nuts are essential gear. Climb through the stepped-out roof using the big pockets to reach a rail. Rail out to the left over the overhang without feet. Continue around the corner and mantelshelf a small platform. Climb the corner for 3m to make a semi-hanging stance. [25] 30m
Continue up the corner system for a couple of metres then move out to the right for a couple of metres. Continue straight up the series of horizontal bands and rails to reach the 'Staircase' Traverse below a small corner/flake feature a metre or two above. Climb this feature and continue up and right on the smooth white wall above. Then head up leftwards to the roof. Climb through the roof and continue up to a small ledge. Continue up to a big ledge to stance. Scramble left for 15m to the huge flat boulder with a fixed abseil, else climb easily to the top.
FA: I. Papert, L. Lindic & Hilton Davies, 18 Jun 2017
| 25
| Trad 46m, 2
| |
|
| 65 | |
★★★ Eternity Road
FA: A. de Klerk, J. Davies & W. Tomlinson, 1982
| 23
| Trad 35m, 2
| |
|
| 66 | |
★★ Finalé
FA: R. Smithers & M. Scott, 1979
| 18
| Trad 65m, 3
| |
|
| 67 | |
★★★ Boltergeist
FA: M Scott + H Graafland, A McKirdy & G Young, 1978
| 21
| Trad 83m, 3
| |
|
| 68 | |
Phantom Squeeze
FA: J. Möhle & Richard Halsey, 2013
| 25
| Trad 55m, 3
| |
|
| 69 | |
★★ Don't Squeeze I'll Laugh
FA: G. Lacey & E. February, 1982
| 20
| Trad 77m, 4
| |
|
| 70 | |
★★ Local Hero
Start as for Tour de Force. Climb the finger crack through the roof.
| 25
| Trad 20m
| |
|
| 71 | |
★★ Tour de Force / Chemin de Fleur
FA: D. Kelfkins & G. Lacey, 1979
FA: E. February, 1988
| 25
| Trad 60m, 3
| |
|
| 72 | |
★★★ Last Laugh
FA: A. Barley & D. Hartley, 1969
| 19
| Trad 69m, 3
| |
|
| 73 | |
★★ Fountain Edge
This route is around 20 left of the point where one would get abseiling from the top of staircase route.
Climb the face just to the left of the arête tending to the right just before getting under the overhang. Climb the arê to stand up in a small ledge above the overhang. Traverse a meter left and climb the 5m face, with no gear but good holds, to a bigger ledge. From the ledge, head to the face on the left on the face and find the clearest way to the staircase ledge. Walk around 8 meters left to a single bench looking rock and climb a small crack system just in front of it (it is just two meters right to the staircase chimney system). Climb the crack to a good ledge. Head right to the top of the big block and up to a big ledge.
This routes ends conveniently very close to the abseil point and an easy scrambling take one to the top of the mountain.
FA: C. Hankey, B. Fletcher & L. Thomas, 1957
| 17
| Trad 68m, 3
| |
|
|
|
| 75 | |
★★ Fountain Corner
| 15
| Trad 70m
| |
|
| 76 | |
Fountain Crack
| 10
| Trad
| |
|
| 77 | |
Black Patch
| 15/16
| Trad 50m
| |
|
| 78 | |
Fountain Fandango
FA: B. Daniel & Hilton Davies, 2009
| 21
| Trad 85m, 3
| |
|
| 79 | |
Fountain Reach-Up
FFA: B. Smith & C. Philips
FA: R. Smithers & B. de Villiers, 1970
| 21
| Trad 3
| |
|
| 80 | |
YOLO
FA: Richard Halsey & F. Walters, Oct 2018
| 19
| Trad
| |
|
| 81 | |
Hyrax the Brave
FA: Richard Halsey & F. Walters, Oct 2018
| 19
| Trad
| |
|
| Route | Grade | Style | | Selected ascents |
| 1 | |
★★ Right Face
| 8
| Trad 400m
| |
|
| 2 | |
★★ Africa Face / Upper Sections
Although it wanders about and is scruffy in places this route is still very popular and is one of the classic climbs on Table Mountain.
Although most parties commence at the level of Africa Ledge, which drops the standard of the route to "E3", the climb starts at the top of Africa Ravine.
A left variation was opened in 1947 but these pitches are now used by Africa Sideburn.
These top sections commence near the extreme left-hand end of Africa Ledge. The pitch is up a face about 10m to the left of the recess used by Africa Nose which is on the left-hand side of the large overhangs.
12m "E1": Climb the face to the ledge above to the left of a rock pillar. Traverse left and scramble through two short rock-bands to a ledge that ends under an overhang. 12m "E2": Climb up to the overhang, traverse right and then continue up to the ledge above. As this pitch is rather bushy it is now usual to do a variation to the right. Climb up a short recess of red rock to below an overhand. Swing left and up to step onto a sloping ledge and continue to a good stance. Walk approximately 2 rope lengths to the left and to the base of a very large chimney. 25m "E3": Bridge up the initial metre or two and then either move into the chimney and continue up the crack on the left-hand wall OR continue bridging up the very edge of the chimney and then traverse into the chimney on the left-hand wall to the stance. 25m "D": Climb up the back of the chimney, over a chockstone, and move out left towards a good rock platform.
Note (i) It is interesting to watch the facial expressions of a second when he discovers the chockstone is loose.
(ii) The Nose Variation starts from this level. If the face is very wet it is probably wise to do this variation. 40m "E1": From the stance move around left on the ledge level with the platform on the face. The exposure now becomes interesting. Continue traversing for about 6m and then move up, using a bollard, and over a smooth sloping section to the top of a second bollard. Continue up for a short distance and then traverse diagonally right towards the chimney. Continue straight up on large holds for the final 10m, on the left-hand edge of the chimney, to a stance under the overhangs. It is possible to break this pitch in two at a small one-man stance below the final vertical section. 40/50m "D": Traverse left until the end of the overhang, then move up and continue along to the extreme left-hand end of the ledge. 15m "E2: Move up and out left from below the small overhang and continue up the crack to a ledge. Walk left to the base of an easy crack. 18m "D": Follow the crack to the summit.
FA: W.T. Cobern, Mr. Humphries, Mrs Humphries & A.P. Stanford, 1914
| 11
| Trad 190m, 10
| |
|
| 3 | |
Africa Face-Nose variation
| 14
| Trad
| |
|
|
|
| Route | Grade | Style | | Selected ascents |
| 4 | |
★ Africa Amphitheatre
FFA: Barley brothers & D. Hartley
FA: K. Fletcher, R. Williams & D. Hartley, 1967
| 20
| Trad 350m, 18
| |
|
| 5 | |
No Horizon
A lonely, exposed pitch consisting of a horizontal roof and steep crack that is visible from Tafelberg road, near the top pitch of Africa Amphitheatre. It could now be done as an alternative, hard last pitch to 'Africa Safari'.
Access: To be done as a single pitch: From the upper cable station, walk towards Platteklip, passing two viewing areas with railings. The next lookout has a stone wall. From here, in the direction of Devil's Peak, one can see a huge, egg-shaped boulder on the edge. About 20m left, as viewed from here, is the top of the pitch. Abseil from good sling points above the left wall of the corner to a platform. Scramble down over a boulder to another ledge below the route.
Route: 30m (24?) Gain the roof and crank through the obvious flake and crack (about 4m long) to the lip, and then follow the steep crack system, taking the right split at the top of the steep section. The top third is still a bit lichenous, but at this stage, the business is over. Consensus grading needed
| 24
| Trad 30m
| |
|
| 6 | |
★★ Kape Moss
A direct line, with interesting pitches and the occasional run-out. With some more cleaning, it will be a 4-star route.
Access
Walk along the Right Face Arrow Face traverse. On the climbers left of the tunnels is a low roof ±15m up. Higher up, there is a long roof about 30m up. Start ±20m to the left of the left end of this higher roof, at a point below an off-width crack 20m above the path. Cairn next to the path at the base of the climb.
25m (17) Follow a crack and short face to reach a small ledge. Continue up the face to the left of a small corner to a narrow chimney with an arête on the right side. Follow this to the off-width that was visible from the ground. Continue up to the ledge with a large sickle-shaped rock to belay on. 25m (16) Climb the corner above and then a layback crack to a ledge. Head slightly left on a face and then easily up to a wide ledge. Walk ±6m right to the base of a clean corner crack. 30m (22) Climb the corner and finger crack to a ledge. Continue up the short right-arching crack until able to pull through the steep left wall to good holds below the left end of the roof. Traverse left over a vegetated ledge and onto a large block. Move up and right to an easy angled ramp. Head straight up to a small grassy ledge (this section is easy but a bit run out with one good rail for gear about 2m from the ledge).
A #4 Camalot may be useful but is not essential. 15m (17) Traverse left and then up to a long, wide edge. Continue left along this until a long pull gains good holds above, which are followed straight up to a broad ledge (sparse gear). Walk right ±5m to a break in the lower overhang that runs across the back of the ledge. 20m (17) Pull up to a wide rail and reach over the roof to good holds. Traverse left ±3m and then straight up until able to move easily left onto the big ledge with a tree at the base of a wide chimney.
A #4 Camalot may be useful but is not essential. 35m (21) To the right of the wide chimney is a left-leaning ramp with good holds, which is slightly separate from the face to the right. Follow the ramp for a few meters and step right onto a narrow ledge. Head straight up the edges on the face above to the next horizontal break. Continue straight up to a large block under the roof. Step right and up to pass the roof, then go diagonally left up a low angle slab to some large pocket-type features. From here crank up until able to reach good holds above the slopers. Continue easily up the face to the next ledge at a point just left of the bushes. Stance directly below the roof crack above. 25m (15) Climb the leftmost side of the juggy face above to the top.
An alternative finish is to blast straight through the roof crack at the top of pitch 6. This was opened in 2012 as the stand-alone pitch called 'No Horizon'
FA: Richard Halsey & T. Lliev, Feb 2018
| 22
| Trad 180m, 7
| |
|
| 7 | |
Kape Moss-Alternative
A direct line, with interesting pitches and the occasional run-out. With some more cleaning, it will be a 4-star route.
Access
Walk along the Right Face Arrow Face traverse. On the climbers left of the tunnels is a low roof ±15m up. Higher up, there is a long roof about 30m up. Start ±20m to the left of the left end of this higher roof, at a point below an off-width crack 20m above the path. Cairn next to the path at the base of the climb.
25m (17) Follow a crack and short face to reach a small ledge. Continue up the face to the left of a small corner to a narrow chimney with an arête on the right side. Follow this to the off-width that was visible from the ground. Continue up to the ledge with a large sickle-shaped rock to belay on. 25m (16) Climb the corner above and then a layback crack to a ledge. Head slightly left on a face and then easily up to a wide ledge. Walk ±6m right to the base of a clean corner crack. 30m (22) Climb the corner and finger crack to a ledge. Continue up the short right-arching crack until able to pull through the steep left wall to good holds below the left end of the roof. Traverse left over a vegetated ledge and onto a large block. Move up and right to an easy angled ramp. Head straight up to a small grassy ledge (this section is easy but a bit run out with one good rail for gear about 2m from the ledge).
A #4 Camalot may be useful but is not essential. 15m (17) Traverse left and then up to a long, wide edge. Continue left along this until a long pull gains good holds above, which are followed straight up to a broad ledge (sparse gear). Walk right ±5m to a break in the lower overhang that runs across the back of the ledge. 20m (17) Pull up to a wide rail and reach over the roof to good holds. Traverse left ±3m and then straight up until able to move easily left onto the big ledge with a tree at the base of a wide chimney.
A #4 Camalot may be useful but is not essential. 35m (20) Tricky gear. Traverse right on the narrow ledge 5 meters up and over a slanted, squeeze type feature to a huge jug. Pull up to a smooth ledge with succulents growing at the back (but avoid the dangerous loose boulder to the left). Pull up and right, and then slightly back left to the low angle slab just over the roof and continue as per the direct pitch. Scramble right and up to a small platform below the final face. 25m (15) Climb the leftmost side of the juggy face above to the top
An alternative finish is to blast straight through the roof crack at the top of pitch 6. This was opened in 2012 as the stand-alone pitch called 'No Horizon'
FA: Richard Halsey & T. Lliev, Feb 2018
| 22
| Trad 180m, 7
| |
|
| 8 | |
Africa Safari / The Constant Gardener
Easiest approach along Arrow Face Right Face traverse. Abseil point from the cherry tree below enormous detached feature mid traverse. Abseil down for the first 2 pitches from “base camp”. 50m rope just adequate.
[21] 20m Climb break in the centre of the wall in line with the abseil to a ledge. [20] 30m Climb the short wall above through the roof. Up cleaned rock, slightly right at the small overhang, pull through and diagonally left to the cherry tree. [12] 15m Scramble on the outside of the anvil-shaped feature and left to the tip. [22] 25m From the tip of the anvil rail 1m left and climb straight up. Up the slab above to a thin crack break above small overlap. Up this, up to a higher rail to rest on the right under another small overhang. Up to the small ledge above on the left. [22] 15m Straight up to the corner leading to the roof. Move left until an undercling and footholds enable one to reach above the overhang. Up the wall on the left to a ledge. [22] 30m Walk 15m left to a corner leading to a rail through the roof. Climb up and left to the blunt arete. Straight up this. Continue in a straight line to chain on a big block in the middle of the bushy ledge. [22] 40m Start 5m to the left on a white arete. Climb up on the pockets, up the break above tending left to below the obvious undercut chimney feature. Puzzle this out and finish at a chain just above. [16] 40m Up 5m to a ledge. Walk left and climb the juggy wall to the top.
On the same level on the ledge to the right is a chain abseil point. 4 abseils off chains around blocks take you back to the traverse line.
| 22
| Trad 220m, 8
| |
|
| 9 | |
★★★ Africa Unchained
📷 Hilton and Tinie on the FA
Pitch 1: 15m Grade 21
Start a bit right of safari and climb up and a bit left at the top to a stance under a left of a roof
Pitch 2: 25m Grade 24+
Climb through the break in the roof a bit right of the stance and continue up the face to the big tea cave ledge where you can walk off
Pitch 3: 8m Grade 19
From the big slot cave stand on a cairn to the left to reach the high rail and do a hard move and the scramble to another big ledge below the huge roof
Pitch 4: 20m Grade 25
Start left of the big flat rock and climb up to the roof break, which has a green triangle jug in the beginning, at the lip go left to a jug and then up right to 2 pegs and continue a little way up to a stance
Pitch 5: 15m Grade 20
Climb up to the top
NOTE:
one can also walk in from the tea cave level and do pitch 3 and then do the money pitch (4) From the big ledge above and lower off the pegs like a sport route And rap off tat down Pitch 3 then walk back to the tea cave
FA: T. Versfeld & Hilton Davies
| 25
| Trad 120m, 5
| |
|
| 10 | |
Roof of Africa
Start: The route starts in the middle of the amphitheatre where a tabletop-sized slab of rock lies at a diagonal angle against the rockface. Scramble up the slab and go right a metre or two on the ledge to the first break consisting of a vertical crack.
Pitch 1 20m 21: Climb the crack for a few metres. Step right and climb up to the roof. Rail left then go up to a big pocket on the left. Reach up to a rail and traverse right above the roof. Climb up to intersect the next roof on its left. Go up the corner then step out right onto the arête. Continue up to the big bushy ledge to stance where Pitch 2 directly begins up the whitish wall above;
Pitch 2 40m 23: Start up the white wall using little rails and pockets to reach a small rail 4m up. Rail right for 2m then climb a crack with a piton. Head up and leftwards over a couple of little ledges. On a ledge walk left along a solid rock razor. At the end climb up leftwards towards a roof. Climb through the roof and continue up to the Right Face – Arrow Face Traverse. Scramble up the back of the Breakfast Rock to stance on top;
Pitch 3 25m 26: At the entrance to the tunnel scramble up onto the rock shelf on the left. Stand on a jammed flake and climb up to the roof. Rail left for 8m (Camalot #3 and #4). At the horn lean out and climb up at a piton to reach the roof above. Rail right for a metre or two then climb a flake and a wall to reach a big rail. Continue up a corner to exit on the left and climb up to a good rail and ledge. (The Right Face Arrow Face Pitch);
Pitch 4 30m 23: Walk 3m right then go up the first break. Climb up to the corner that goes through the small roof. Climb the corner and the arête to the right for a couple of metres. Step across to the left and rail out for 3m. Pull up into the Post Box then up to a thin rail above it with a piton. From the piton go 1m right and climb the steep edge to a little ledge. Go diagonally up leftwards for some way to reach a hanging stance with a piton below the hanging corners.
Pitch 5 30m 23: Climb the hanging corners angling up leftwards. Break through the roof at the left end and climb the wall to a big ledge. Bring the party up then walk 10m up and over to the left and around the corner (passing Africa Safari’s arête) to make a stance directly below the big crack through the huge dimpled roof.
Pitch 6 35m 28: Climb up to the roof then hang upside down to climb the crack to the lip and then 2m up the wall to the first rail. Traverse a long way left and upwards to a break where you start up left then at a roof go a little right and up a finger crack and up to a roof with a good rail. Rail left to the little Diving Board, climb up onto this horizontally wedged flake without pulling it off, and continue straight up to the big camping ledge.
Pitch 7 25m 22: Step off the big flat rock and pull up to get onto a semi-sitting ledge. Go a metre or two to the right to the obvious post box for a Camalot #2. Climb the break up on the left to get onto the wall. Go up and left to the attractive white wall. Climb the blunt arête and head up to a good ledge;
Pitch 8 15m 23: Lead off to the right and climb the crack through the enormous roof. Go up the corner then exit left onto a small stance;
Pitch 9 15m 28: Go up right into the crawling ledge. Climb the underside of the biggest part of the roof to get to the pointy tip. Get onto the wall and climb the arête and the wall to the left to get up to a small ledge and stance. Bring the party up then scramble and then walk left along the ledge. Scramble up to the obvious rock platform below the big arête to stance;
Pitch 10 20m 20: From the platform pull up the steep arête and continue up to the roof. Go left for a few metres to a break, through the small roof. Continue directly up to the top.
Descent: Cable car or India Venster walk.
FA: T. Versfeld, D. Birkett & Hilton Davies, 28 Jan 2018
| 28
| Trad 260m, 10
| |
|
| 11 | |
Horn of Africa
Approach: The route starts at the top of Africa Ravine. There are several good ways to get to it. The nicest is to get to the Right Face – Arrow Face Traverse tunnel and then do a 50m abseil off the big cherry tree using the lowest link in the big chain.
Start: The route starts at the far left of the amphitheatre on the clean white rock below the big overhangs 60m above. A few metres right from the tree in the very corner find a cairn below a clean vertical crack.
42m 20: Climb the crack for 10m to a ledge. Step right and climb the big, thin flake for a few metres. Start up leftwards on the pocketed brown wall then angle to the right. Step around into a corner and head up for a few metres. Climb the 10m face on the right up to a good ledge. Walk out right and stance at the end; 27m 16: Go up for a few metres then angle up rightwards for 10m then go straight up a big corner to stance on the bushy Right Face – Arrow Face Traverse. Walk left (east) for 15m to just beyond a big tree. Stance at the big detached block beneath an overhang; 27m 20: Stand on the block to place gear at full stretch in the thin horizontal rail. Rail to the right for a couple of metres then crank hard to get onto the ledge. Climb up on the left for a few metres to a ledge. Climb the slab close to the right end up to a small ledge. Climb the next slab in the middle up to a big ledge; 27m 22: Start up the appealing corner on the left and get up into a big groove. Continue straight up and right up laybacks for 10m to a small roof. Climb around the roof on the left. Climb 10m up cracks and a pod to reach a big ledge. Walk a few metres left to stance at the huge block; 15m 20: Start in the chamber behind the huge block, and scramble up left to the base of a crack system. Follow this for a few meters and pull up and left to a little platform. Pull onto the face on edges and up left to the top of the crack taken by Kape Moss pitch 3. Traverse right on the sloping ledge to a stance below a very thin crack in the face over the roof; 25m 26: Crank over the first roof by the thin crack to a shelf below the second bigger roof. Rail right to below the steep bottomless corner at the right side of the roof above. Get a few micro/small wire placements in the horizontal seam at the base of the corner before launching into the crux sequence. Hard moves past a narrow, vertical finger slot lead to a good rail at the next overlap. Traverse left until the end of the rail, below a bulging section. Pull through and step left on the face above. Continue straight up to a final rail, step 1m left and then up onto the slab that is followed to the bivvy ledge. Walk a few meters left to a split block below a break in the low overhang. (Maybe 27+ for onsight); 20m 19: Pull through the low overhang onto the white face and head straight up to the left side of a small roof in the middle of the face. Pull through and step right to above the roof and tend right for two or three metres. Continue up through at a break and then left to stance below a large corner (taken by Africa Amphitheatre); 30m 20: Climb over some blocks to the white face that forms the left side of the huge corner. Head straight up the middle of the face. Crank off the 4 or 5 horizontal ripples then run it out until the rail. The holds are positive but don’t fall off - that landing would be bad. At the roof move left to the break through the roof on the left side, then up the ramp to the left and easy face to the ledge; 20m 15: Climb the juggy wall on the left to the top.
Descent: Cable car or India Venster walk.
Notes: Double rack of cams, full set of wires including micros and 50m ropes are recommended. The crux pitch could be done with a single point of aid at about 23 A1. A free link-up at grade 22 would be to skip the crux pitch by moving from Pitch 5 into the top part of Kape Moss pitch 3 until the Bivvy Ledge.
| 26
| Trad 230m, 9
| |
|
| 12 | |
Gardener Wall
Pages 44-48 MCSA Journal 1945
FA: P. O'Neill, E. Pentz, L. Schaff & O. Shipley, 1945
| 16
| Trad
| |
|
| 13 | |
Gerdener Crag
Pages 37-43 MCSA Journal 1925
FA: C. Hutchinson, G. Londt & E. Townsend, 1925
| 14
| Trad
| |
|
| 14 | |
Avernus
Pages 112-114 MCSA Journal 1959
FA: E. Esterhuysen, J. de Villiers Graaff & P. White, 1959
| 16
| Trad
| |
|
| 15 | |
Africa Addio
Pages 152-153 MCSA Journal 1967
FA: G. Athiros & M. Scott, 1967
| 14
| Trad
| |
|
| 16 | |
Africa Sideburn
Pages 94-95 MCSA Journal 1970
FA: G. Athiros, B. Honey & M. Scott, 1970
| 17
| Trad
| |
|
|
|
| Route | Grade | Style | | Selected ascents |
| 1 | |
★★★ One Flew Over the Cuckoo's Nest
[30] 23m [17] 30m [22] 12m [24] 14m [26] 12m [23] 30m
FA: D. Hartley & C. Lomax, 1977
FFA: J. Colenso & A. Vercueil, 1991
| 30
| Trad 120m, 6
| |
|
| 2 | |
★★★ Darkest Africa
Roof to the right of Cukoo's nest.
| 31/32
| Trad 30m
| |
|
| 3 | |
★★ Can Can
[18] 12m [14] 26m [16] 10m [16] 30m [13] 15m [20] 20m
FA: D. McLachlan & R. Smithers, 1974
| 20
| Trad 110m, 6
| |
|
| 4 | |
★ RockMeet Special
| 14
| Trad 6
| |
|
| 5 | |
★★★ Dynamite
[19 A1] 30m [14] 28m [19] 25m Can be done as an excellent stand-alone pitch. [26] 15m
FA: K. Fletcher & D. Hartley, 1969
FFA: J. Samson, 1998
| 26
| Trad 98m, 4
| |
|
| 6 | |
★★★ Africa Corner
[13] 35m [11] 23m [13] 12m [13] 20m Climb the block, then the face and up to the abseil or cableway.
FA: W. Cobern, J. Fraser, G. Londt & A. Stanford, 1915
| 13
| Trad 130m
| |
|
| 7 | |
★★ Africa Eyrie
[15] 30m [13] 10m [12] 18m [13] 12m [14] 12m [12] 9m [13] 25m
FA: K. Fletcher & J. Goedknegt, 1962
| 15
| Trad 120m, 7
| |
|
| 8 | |
★★ Left Hand Route
Start between 'Africa Eyrie' and 'Atlantic Crag'
FA: T. Dick & T. Versfeld
| 20
| Trad 20m
| |
|
| 9 | |
★★ Right Hand Route
CLimb 'Left Hand Route' tend right after the roof.
| 21
| Trad 20m
| |
|
| 10 | |
★★★ Atlantic Crag
[18] 18m [14] 20m [11] 3m [14] 30m [15] 12m [18] 10m
FA: M. Andersen, D. Bell, M. Mamacos & P. O'Neill, 1951
| 18
| Trad 93m, 6
| |
|
| 11 | |
Tales of Tranquility
Start on 'Atlantic Crag'
| 22
| Trad
| |
|
| 12 | |
Cabbage Fingers
[17] [19] [19] [20] [16]
FA: D. McLachlan & B. Gross, 1978
| 20
| Trad 5
| |
|
| 13 | |
★★ Ruminating Crag
FA: B. Cameron & R. Kingma, 1935
| 17
| Trad 50m
| |
|
| 14 | |
Little Jack Horner
[16] 10m [17] 20m [12] 12m [17 A1] 12m [16] 15m [16] 26m [14] 15m
FA: M. Scott, R. Smithers & E. Marais, 1980
| 17
| Trad 110m, 6
| |
|
| 15 | |
★★★ Arrow Final
[10] 10m [11] 30m [10] 45m [9] 6m
| 11
| Trad 91m, 4
| |
|
| 16 | |
Clockwork Orange
[20] 40m [23] 35m
FA: G. Morton, D. McCrindle & V. Vajner, 1990
| 23
| Trad 75m, 2
| |
|
| 17 | |
★★ Africa Wall
[12] 30m [15] 22m Dassie crawl [14] 12m [14] 6m [15] 30m [14] 6m [15] 10m
FA: R. Burton, H. Biesheuvel, G. Jones & O. Shipley
| 15
| Trad 120m
| |
|
| 18 | |
★ Africa Scandal
[17] 31m [13] 31m [21] 30m [13] 14m
FA: R. Ballie, M. Boyes, B. Clark, A. Gruft & B. Honikman, 1960
| 21
| Trad 110m, 4
| |
|
| 19 | |
Africa Salad
FA: D. Mclachlan, R. Smithers & M. Scott, 1974
| 17
| Trad
| |
|
| 20 | |
★ Rock Meet Special
[12] 14m [12] 22m [14] 15m [12] 22m [11] 25m [13] 20m
| 14
| Trad 120m, 6
| |
|
| 21 | |
★★★ Dynamighty
| 28
| Trad 15m
| |
|
| 22 | |
★★ Africa Cracks
[12] 27m [12] 23m [15] 27m [16] 22m
FA: C. Butler, M. Mamacos, E. Weir & G. Kaye, 1949
| 16
| Trad 99m, 4
| |
|
| 23 | |
★★★ Even Whisperers Can Shout
Start as for 'Oddshouter's Outing'
| 24
| Trad 26m
| |
|
| 24 | |
★★ Local Legend
[19] 30m [24] 12m [22] 12m [18] 12m [20] 12m
FA: Hilton Davies, N. Havenga & A. Davies, 2011
| 24
| Trad 78m, 5
| |
|
| 25 | |
★★ Africa Link Up
Direct variation to P1: 19
Alternative finish to P4: 19, A1
FA: S. Larsen & E. Astor, 2002
| 17
| Trad 130m, 4
| |
|
| 26 | |
★ Moonrake
FA: R. Baillie, B. Cliff & M. Mamacos, 1962
| 16
| Trad 76m, 4
| |
|
| 27 | |
★★ Last Three Inches
[7] 10m [17] 20m [19] 35m [20] 10m [15]17m
FA: D. Jamison, A. Gibson, D. McLachlan, G. Lacey & C. Lomax, 1978
| 20
| Trad 92m, 5
| |
|
| 28 | |
★★ Hard Times
[17] 25m [19] 20m [15] 20m [22] 38m
FA: R. Barley & M. Scott, 1979
FFA: M. Roberts, 1981
| 22
| Trad 100m, 4
| |
|
| 29 | |
★★★ Sanitarium
[20] 40m [25] 30m
| 25
| Trad 70m, 2
| |
|
| 30 | |
★★ Head Cut
FA: Charles Edelstein, T. Dick & B. Daniel, 2008
| 21
| Trad 15m
| |
|
| 31 | |
★★★ Africa Edge
[16] 12m [20] 15m [21] 20m [20] 15m [22] 20m
FA: R. Breyer, Charles Edelstein & T. Dick, 2009
| 22
| Trad 82m, 5
| |
|
| 32 | |
★★★ Africa Edge-Variation
| 22
| Trad
| |
|
| 33 | |
★ Step Over 2 Africa
| 21
| Trad 130m
| |
|
| Route | Grade | Style | | Selected ascents |
| 1 | |
★★★ Atrocity Exhibition
| 28
| Trad 20m
| |
|
| 2 | |
Polyphased Deformation
FA: A. de Klerk & G. Morton, 1984
| 21
| Trad
| |
|
| 3 | |
★★ Africa Gullet
A direct, sustained route on good rock with a heart- stopping, pivoting block in an unexpected place.
Starts just to the right of the first pitch of Africa Crag.
[15] 12m Ascend the crack on the right of a smooth face to the right of Africa Crag. First move into the left-hand side of the cave and then up the crack using Crag. a chockstone. Continue up to a stance shared with Africa [14] 26m Climb 6m up the crack directly above to the ceiling of the overhang. Traverse to the left for 10 m to a corner on the skyline. Move up a few feet to a cubby-hole, and then climb 8/10 m to a Climbers' Friend bush above. Traverse below the bush and then climb up to the Upper Africa Ledge. Cross Africa Ledge to the nose on the left. The next pitch is up the face midway between the Africa Crag and the Africa Wall chimneys. [16] 35m Ascend a tricky, bulging face for 7m until it is feasible to traverse to the left into a cubby-hole stance. Above this stance the Africa Crag traverse leads out on to the nose. Climb the crack above to a small stance below a jammed block. Move to the right around the jammed block, and then climb to a triangular overhang. Elbow-traverse to the left and then mantelshelf on to a small stance. [17] 12m Above the stance there is a slanting handrail running down to the right: grip this and swing up to the corner on the left where one can stand. Now move up a metre to another handrail, running to the left, and tra= verse to the left past an eroded cubby-hole, until a ramp running diagonally across the face to the left is reached. Climb the ramp to a handrail, and traverse 3 m to a good stance around the corner on the left. This stance is shared with the top of the nose pitch of Africa Crag. [12] 20m Start 3m to the left along the stance below a bulging face. Climb 5m and mantleshelf on to a narrow stance. Climb up a metre or two and then, balance diagonally left on sparse grips to a recess 3 m away. Climb the 7m recess to a good stance. [10] 15m Proceed to the beacon on a ledge a couple of metres above the stance. Climb the smooth face for 6 m bearing slightly to the right. From the small grassy stance reached, continue for 6 m up the fault to the right of the stance. Nondescript climbing leads to the top of the mountain.
FA: J. Goedknegt & K.D. Fletcher, 1961
| 17
| Trad 120m, 6
| |
|
| 4 | |
★★★ Comfortably Numb
| 27
| Trad 20m
| |
|
| 5 | |
★★ Flaky Dog
Despite the lichen that plasters the second pitch of the climb, this route has the potential to become a classic if it is “climbed into condition”. It is a moderate 2 pitch route that involves classic sustained TM climbing on steep rock, with excellent protection.
Start: The route starts just to the right of the Africa Gullet crack on the upper Africa ledge.
[21] 25m Climb the face just to the right of Gullet’s crack to a cruxy section. (One can cheat by straddling across Gullet’s crack). Pass this to a good rail. Rail right to steep juggy rock that leads you to a stance. Belay off the abseil bolts. [21] 30m Climb the “staggered crack” that diagonals up to the left to a grassy stance. Don’t stop here but rail easily left above Odd Shouters crux and then up to a stance. Continue wandering easily to the top back to the abseil anchors.
| 21
| Trad 55m, 2
| |
|
| 6 | |
★★★ Oddshouter's Outing
[19] 12m [20] 20m [16] 20m [17] 25m [22] 25m
FFA: A. Forsyth, M. Scott & R. Barley, 1979
FA: R. Smithers & R. Barley, 1979
| 22
| Trad 100m, 5
| |
|
| 7 | |
★★★ Oddshouter's Outing-Variation
| 22
| Trad
| |
|
| 8 | |
★★ Africa Nose
[13] 6m [9] 5m [12] 12m [14] 5m [9] Traverse 10-12m left. Start left of Africa Cleft Chimney [13] 10m [14] 17m [16] 22m [Easy climbing] 2-3 pitches
FA: E. Chadwick, E. Keen, B. Russel, L. Schaff & O. Shipley, 1948
| 16
| Trad 89m
| |
|
| 9 | |
★★ The Squeal Deal
A direct line, with a short but powerful and technical crux in a great position. The easier finish makes for a good, consistent route up the wall.
30m (18/19) Start as for Odd Shouters Outing P3 from Upper Africa ledge but continue up the middle of the face between Hole in my Sole and Odd Shouters, passing a large grass tuft (at the base of the wide crack) by climbing the face to left. From the next ledge, continue up and slightly left to just underneath the pivoting block on Gullet. Pull through about ~1m right of this and then step left to stance on the ramp and blocks to the left. 15m (24) Move up and left to follow a short, blunt arête to a small ledge. Step right to the pegs on Odd Shouters and then straight up, just to the right of the pegs, to the roof via some cool sequences. There is a bomber #1 and #2 Peenut in a narrow horizontal rail just right of the pegs. At the roof traverse, 1m left and then pull through the left end of the roof onto good holds and easy climbing to the large ledge above. Consensus grading needed.
An alternate finish (16) moves left along the ledge from the pegs and follows good holds on the vague arête and then up to the big ledge.
Walk left and finish up Africa Crag.
Lower sections of this route have likely been climbed before as linkages between other routes, and at least one party has tried the crux section above the pegs.
FA: Richard Halsey & G. Bird, Mar 2018
| 24
| Trad 45m, 2
| |
|
| 10 | |
★★★ Odd Squeakers Shouting
A long, sustained pitch with a variety of trickiness. A tad heady in places. Start just right of the Gullet crack.
Pull up onto the centre of the face to the right of the Gullet crack. Continue up to below the blank looking section, at the base of vague, wide U shape formed by sloping ramps. Head straight up the middle of the face to a rail. (Flaky Dog P1 is to your left, and there is a very narrow horizontal break for micro nuts). Continue up the centre of the wall via difficult moves past an undercling to a wide rail. Pull out and right over the next overlap and then tend left to another cryptic bulge. Pull through the next steep section to below a sandy recess, which is avoided by pulling up left to a layback crack in the grey face. Follow this to join the crack on Oudshouters, and finish through the roof crux on that route. Traverse off left and easily out to top (end of Africa Crag). Consensus grading needed, might be a tad harder.
| 24
| Trad 45m
| |
|
| 11 | |
★★★ Africa Crag
The climb commences on the white face just to thw left of the Lily Pond.
P1 & 2 can be bypassed by climbing the first pitch of Africa Wall, bringing the grade down to 13.
[15] 25m Previuosly 2 pitches. Pull up on the white fae on horizontal holds. Move right into the groove. Climb up with an awkward move up on a sloping ledge, then a delicate move up on tiny footholds on the rib on the right to reach the handgrips on the top. Exit up right on to the stance. Traverse across left and out on to the projecting platform on the nose [11] 28m Climb the face to the broad Upper Africa Ledge. Now walk across to the left to the base of a chminey, facing the cable station. in the huge nose. [10] 23m Climb 8m up the chimney and traverse out left around the
corner for 12m and move up to a small stance on the edge of a diagonal crack on the side of the nose. [13] 36m Pull up from the stance and traverse up and across left to a tiny platform on the front edge of the noae. Pull up through an overhang on to the crest of the nose above, and continue up the right-hand ednge until possible to move up onto a ledge stance with a huge block on it. (It is also possible to move up using a recess just right of the actual crest of the nose instead of pulling up from the tiny platform. [12] 20m From the back of the stance step slightly down and to the left, climb a crack to a horizontal handrail. Traverse left on the corner, then climb the easy face above to a large ledge. [9] 15m A grass covered face behind the ledge is now climbed from right to left into a gully leading to behind a large block. Climbing out around the back of this blockand on to the front of it leads to easy rock to the top.
FA: A. Cameron, B. Cameron, E. Grendon, A. Sluman, S. Smith & D. van Breda, 1936
| 15
| Trad 150m, 6
| |
|
| 12 | |
★★ Hole in My Sole
FA: Hilton Davies & G. Paterson-Jones, 26 Dec 2015
| 24
| Trad 80m, 3
| |
|
| 13 | |
Africa Nemesis
[14] 27m [17] 20m [12] 46m Scramble to the top.
FA: G. Athiros & M. Scott, 1973
| 17
| Trad 93m, 4
| |
|
| 14 | |
Tin Can Alley
FA: R. Smithers & R. Barley, 1979
| 20
| Trad 2
| |
|
| Route | Grade | Style | | Selected ascents |
| 1 | |
★★★ Redback
Varied climbing, with a short, fierce section on the crux pitch.
10m (18) Climb the Bust Up crack to the small ledge on the left. 15m (22) Start by an old peg and climb up ~3m to a thin rail. Traverse left to the next old peg and follow the crack system up and very slightly right to reach the stance shared with Daddy Long Legs (peg under a small overlap) 15m (25/26) Follow the crack on the right side of the stance to the left end of a narrow roof. Pull up to some underclings and traverse ~3m right and then up to a thin rail (micro cams useful). A hard move up to the next rail and then a long pull to a pocket above the narrow overlap. Head diagonally left to the wide rail below the main roof at the height of the Bust Up flake.
Abseil point (hex and cam) in situ.
The pegs on pitch 2 were from a potential alternate start to Bust Up attempted by Greg Mosely and Andy Killick in 1971!
FA: Richard Halsey & J. Smith, Jun 2016
| 25/26
| Trad 40m, 3
| |
|
| 2 | |
★★★ Daddy Long Legs
Hard line in a great position. From the Uber Huber platform, dassie crawl left to a ledge where the route starts.
28m (22) Climb Bust Up pitch 3. At the first big ledge (where Bust Up pitch 4 heads up and right) continue straight up a small left-facing corner. Continue straight up to a stance with an old peg under a projecting block. 20m (27) A key tufa-like hold on the original pitch has broken, which means you need to climb closer to the big corner on the left. This prompted a better, right-hand version that keeps you away from the big corner but may be harder for shorter folks. Move out diagonally left from the stance and then straight up for a few metres to a handrail below an overlap. For the RHV, move right to where the overlap narrows and make a long, hard move to a large pocket, and continue up to the narrow roof. (Alternatively, climb the face about 1m right of the big corner, resisting the temptation to step on the left wall, to the narrow roof and rail ~1.5 right). Head straight up and right of a large right-facing flake feature using strenuous underclings, and then tend right to finish under the large roof.
Abseil from fixed gear (two large hexes). Advisable to place at least one piece on the way down, as it is steep. While 50m ropes should work, this has not been tested so recommended to use 60m ropes.
FFA: G. Lipinska & C. Martinengo, Jan 2016
FA: G. Lipinska, Richard Halsey & J. Wakeling, Jan 2016
| 27
| Trad 48m, 2
| |
|
| 3 | |
★★★ Barking Spider
Superb climbing with an airy finish
Climb either the first pitch of Daddy Long Legs or Redback to reach the peg stance.
From the left side of the peg stance, climb straight up for about 8 meters to gain a rail under a small overlap. Climb past a rather useful pocket and pull through the next overlap (just left of Redback anchor) to another rail. Place good gear in this rail below the vertical seam on the headwall. Gain this seam boldly (but safely) from the left and follow it to the anchor for Daddy Long Legs. A 0.4 camalot is useful for the last section.
| 28/29
| Trad 25m
| |
|
| 4 | |
★ Africa Cleft
[14] 9m [15] 24m [14] 6m [14] 35m [15] 28m [14] 9m [12] 23m
FA: B. Fletcher, J. Quail & P. White, 1962
| 15
| Trad 130m, 7
| |
|
| 5 | |
★★★ Africa Bust Up
FA: T. Hughes & J. Levy, 1971
| 19
| Trad 140m, 6
| |
|
| 6 | |
★★★ Golden Orb
Fun for the whole family
Start: Halfway along the dassie crawl ledge about 3 meters right of Bust Up. Belay by a large boulder.
28m (24) Climb the left-leaning crack to a powerful move about 7 meters up. From this climb straight up to a wide break. Pull through the overhang and continue straight up and then move right 2 metres to stance on a small triangular ledge with good gear (finger size cams) in an intermittent vertical crack at about head height. 25m (28R) Climb straight up for about 5 meters (Shared with Bust Up). Move right onto the arête for a couple of moves then follow the break diagonally left to the rail 2 meters below the big roof. Move ~1.5m left, then up and right to the next rail using a square pocket. Pull through the roof and move back right for ~1.5m. Place a crucial wire (No. 7 BD stopper) on the lip and run it out on pumpy, technical moves to the anchor in the next rail (the fall from the last hard move is scary but safe).
Variations: A direct version that is more suited to taller folk still needs to be climbed (Platinum Orb, 29ish). This avoids the left detour by using 2 large pockets and pulling directly through the large part of the roof.
An even more indirect version moves left to the Redback anchor (Silver Orb, 26ish)
FA: J. Smith & Richard Halsey, Jun 2016
| 28 PROT:R
| Trad 53m, 2
| |
|
| 7 | |
★★★ David and Goliath
[21] 15m [26] 20m [26R] 20m
FA: T. Versfeld & D. Birkett, 2002
| 26 PROT:R
| Trad 55m, 3
| |
|
| 8 | |
★★ Black Widow
28m (24) Start as for Incy Wincy Spider. At the first rail, move left and then up over easy ground aiming for the bottom part of the darker grey face. At this point, there is a sickle-shaped flake up and right (very loose). Traverse 1m left at the finger rail and then straight up the steep face to the next set of rails. Move 1.5m left and follow the right side of the vague arête, then up the short slab to the narrow ledge. Stance at an old peg and ring. 15m (25) Bring small and micro cams for this pitch. Place a high wire on the Bust Up pitch, and then move back down and left across the blunt arête. Follow the good holds just left of the arête until the wall blanks out. From the undercling, traverse ~2m left using two small uncut holds and then up to a large side-pull below a handrail. Head straight up past some large pockets to a rail below the roof (and garden above). Move slightly right to a hanging stance with a good foothold.
Pitch 3. 20m (22) Traverse right, under the Bust Up roof flake, and all the way to join the last few moves of Uber Huber. Abseil from fixed gear to the start of the route.
If you want to top out, traverse right then join Bust Up.
FA: Richard Halsey, J. Theron & G. Lipinska, Aug 2015
| 25
| Trad 63m, 3
| |
|
| 9 | |
★★★ Black Widow Direct
A harder, more direct first pitch to Black Widow.
Start as for Black Widow. After the dark grey face, instead of moving left all the way to the right side of the vague arête, head straight up (via a long throw out left to a large flat hold) and then up to gain an intermittent finger crack. This is about 1.5m right of where Black Widow goes. Climb the tricky crack and straight up to the ledge. Move left to stance. Consensus grading required.
FA: Richard Halsey & S. Jansen van Rensberg, Aug 2015
| 26/27
| Trad 27m
| |
|
| 10 | |
★★★ The Huntsman
A steep, sustained pitch up to the Bust Up ledge.
Start as for Black Widow but at the first rail continue straight up. Follow a slab to the right of the loose flake (slight run out) to a curved series of side pulls. Traverse ~1.5m left until able to pull up to the good rail. Step right and pull up to the next set of rails. Move left to the large undercling and blast straight up to the far right end of the Bust Up ledge. Consensus grading required
FA: Richard Halsey & C. Martinengo, Sep 2015
| 25
| Trad 27m
| |
|
| 11 | |
★★★ Incy Wincy Spider
Climbs the beautiful white face between David And Goliath and Uber Huber left of the Africa Crag nose. From the left end of the Upper Africa Ledge, traverse under the Africa Crag nose, climb up 6m to a ledge, and walk left to where the ledge becomes a crawl under a low roof.
30m (29) Start at the left end of the ledge where one can still stand upright. Climb the shallow corner tending slightly left as it steepens. Head towards the obvious, thin crack through the widely spaced rails above. Climb this and continue up another 5m to a hanging belay at the big rail below the narrow roof at the same level as the huge roof to the right. Probably a couple of grades easier if one is tall enough but this still awaits confirmation. 20m (26) Start up a short, vertical crack to a big undercling. Move right to a good layback hold and then up past a couple of flakes and a rail to another rail at a small roof. Traverse left to the arete. Do a couple of moves up to a peg (shared with David And Goliath) and then left to a hanging stance at the base of the big roof flake of Africa Bust Up. 40m (17) Finish by doing the top of Africa Bust Up. Climb the flake through the roof and up to a big ledge (optional stance). Continue up and right through some vegetated terrain to a huge ledge from where one can scramble to the top.
FA: G. Lipinska & D. Steyn, 2015
| 29
| Trad 90m, 3
| |
|
| 12 | |
★★★ Uber Huber
[23] 20m [24] 20m [26] 15m
FA: T. Versfeld & T. Dick, 2005
| 26
| Trad 55m, 3
| |
|
| 13 | |
★★ Africa Eyelash
[19] 8m [12] 12m [14] 22m [14] 6m [16] 11m [16] 20m [14] 21m
FA: B. Fletcher & P. White, 1960
| 19
| Trad 100m, 7
| |
|