A Crag Guide gives an extensive view of all sub areas and climbs at a point in the index. It shows a snapshot of the index heirachy, up to 300 climbs (or areas) on a single web page. It shows selected comments climbers have made on a recently submitted ascent.
At a minor crag level this should be suitable for printing and taking with you on a climbing trip as an adjunct to your guidebook.
This guide was generated anonymously. Login to show your logged ascents against each route.
Warning
Rock climbing is extremely dangerous and can result in serious injury or death. Users acting on any information directly or indirectly available from this site do so at their own risk.
This guide is compiled from a community of users and is presented without verification that the information is accurate or complete and is subject to system errors. By using this guide you acknowledge that the material described in this document is extremely dangerous, and that the content may be misleading or wrong. In particular there may be misdescriptions of routes, incorrectly drawn topo lines, incorrect difficulty ratings or incorrect or missing protection ratings. This includes both errors from the content and system errors.
Nobody has checked this particlular guide so you cannot rely on it's accuracy like you would a store bought guide.
You should not depend on any information gleaned from this guide for your personal safety.
You must keep this warning with the guide. For more information refer to our:
Usage policy
Contributors
Thanks to the following people who have contributed to this crag guide:
Su A. Alteen
Sergey Komarov
David Gibbs
John Erwin
The size of a person's name reflects their Crag Karma, which is their level of contribution. You can help contribute to your local crag by adding descriptions, photos, topos and more.
Table of contents
- 1.
Swift Current
38 in Crag
- 1.1. Geometry Wall 11 in Cliff
- 1.2. Tiger Wall 13 in Cliff
- 1.3. Tiger Slabs 7 in Cliff
- 1.4. Halfway Wall 0 in Cliff
- 1.5. Weather Wall 7 in Cliff
- 2. Index by grade
1. Swift Current 38 routes in Crag
- Summary:
-
Sport climbing and Trad climbing
Lat / Long: 47.884220, -54.188526
description
A series of granite bluffs known locally as "Mount Rat" above the town of Swift Current. There is overhanging, vertical, and slab climbing all within a small area with huge potential for development.
Important Safety Consideration: There is very little cellphone reception in the town of Swift Current. Reception can be found at the government wharf, at the Weather Wall, at top of Halfway Wall (aka "The Lookout"), and at the top of routes on the Geometry and Tiger Walls. In case of emergency, the fastest way to contact help may be finding the nearest landline.
approach
Heading south down the Burin Peninsula on Route 210 you'll enter the town of Swift Current, shortly after entering the town turn right onto Memorial Lane (marked as "Shoal Cove Heights" on Google Maps) and head briefly up the hill to park at the cemetery.
Note that there is a residence is beyond the cemetery and care should be taken to not block this driveway, nor the gate to the cemetery. Also, if there is a funeral taking place, please find alternative parking and respect to those in mourning while passing by the cemetery.
A wide trail begins behind the cemetery and goes up the hill and then at a small clearing you take a narrower trail into the woods (shown in the picture attached to the area). The trails to each crag are marked with flagging tape in the colour listed below. Check out each walls individual page for more detailed info and the map attached for an overview.
Trails flagged in 2022 (See the 2022 trail map photo):
Main access trail to Tiger Wall - Orange
Geometry Wall - Pink (veers left after following orange tape for about 50m)
Continuing from Tiger Wall - Yellow
Yellow tape from Tiger Wall leads to a junction. The left fork (Purple) will lead to Tiger Slabs and the right (blue) leads to Weather Wall.
where to stay
Kilmory Resort offers 21 pine log chalets for rent, for those in search of comfortable accommodations at reasonable rates. Great views and a opportunities for other outdoor activities (kayaking, swimming, fishing).
Informal camping is available at Piper's hole campground, which used to be a provincial park. It's located a few kilometers from the crags at Swift Current. The road into the campsites is a somewhat rough gravel road, but most small cars should be able to negotiate it without bottoming out. There are a number of campsites, and free camping is informally tolerated there. Please dispose of waste properly, and pack out all garbage.
Directions: http://goo.gl/maps/XvBWLq11LAB2
The closest convenience stores and gas stations are in Goobies. However, you can buy bags of ice at Kilmory Resort.
There is also a chip truck in between the crag and Kilmory Resort (LJ's), which has really good fries. Open 12-6, cash only.
1.1. Geometry Wall 11 routes in Cliff
- Summary:
-
Mostly Sport climbing
Lat / Long: 47.884054, -54.190494
description
Overhung granite wall with blocks, edges, and cracks around interesting geometric features with mostly sport routes at a wide range of grades. All have high first bolts and can be challenging right off the deck, so a stick clip is necessary.
The easiest way to the top of the wall is via Polygon-na Climb it (5.8 sport) and from there you can reach all the anchors between Gee, I'm a Tree and Polygon-na Climb it. All the routes have rappel anchors.
Gee, I'm a Tree and Trihardral were authored by Phil Stennett and David Bruneau respectively in 2013. The other routes were authored by Daniel Alacoque and others in 2020 and 2021.
approach
From the end of the trail at the base of Tiger Wall head left along the base. After passing a large gully the trail drops down again to another crag.
Trails flagged in 2022 (See the 2022 trail map photo):
Main access trail to Tiger Wall - Orange
Geometry Wall - Pink (veers left after following orange tape for about 50m)
Continuing from Tiger Wall - Yellow
Yellow tape from Tiger Wall leads to a junction. The left fork (Purple) will lead to Tiger Slabs and the right (blue) leads to Weather Wall.
 |
||||||||
| Route | Grade | Style | Selected ascents | |||||
|---|---|---|---|---|---|---|---|---|
| 1 |
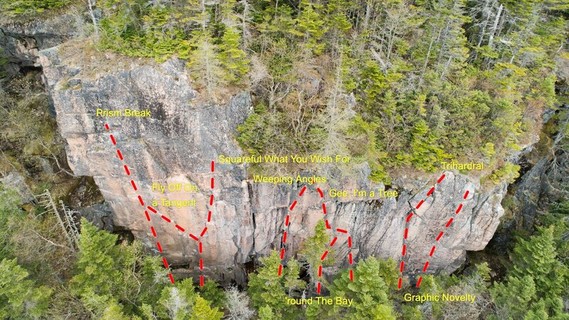
★★★ Prism Break
This slighly overhanging section of wall is the tallest section on the Geometry wall. Very sustained climbing on comfortable granite edges leads to an epic lunge to the final ledge. In David Bruneau's words: It might be Newfoundland's first enduro 5.12a Start under the two obvious triangular prisms in the wall. Just left of Squareful What You Wish For. 6 bolts and quick clips to lower off FA: Daniel Alacoque, May 2021 | 5.12a | 15m, 6 | |||||
| 2 |
★★★ Fly Off On a Tangent
Climb and climb three bolts on Squareful What You Wish For and veer left on a series of ledges. Clip two intermediate bolts and join up with the final two bolts of Prism Break. Save some energy for the final move. Start on the obvious triangle of Squareful What You Wish For 7 bolts and quick clips to lower off FA: Daniel Alacoque, May 2021 | 5.12a/b | 15m, 7 | |||||
| 3 |
★★★ Squareful What You Wish For
Description Start at the triangle and trend slightly left for the first three bolts. Climb back right to the square and straight up to the large ledge. Finish on jugs to the right of the anchor. Location Start at an obvious triangular-shaped rock to the left of the wet section Protection 6 bolts and quick clips to lower off FA: Daniel Alacoque, Sep 2021 | 5.10d | 20m, 6 | |||||
| 4 |
Hypotenuous
Description Jump up to the start hold and continue off and on the obvious arête to join up with the end of Squareful what you wish for. Location Jump up to the obvious jug above a wet spot. Protection 6 bolts and quick clips to lower off FA: Daniel Alacoque, Jun 2022 | 5.11d | 18m, 6 | |||||
| 5 |
Weeping Angles
Description Start with a low crux in the wet corner. Climb up and left before swinging back right to finish at the Gee I'm a Tree anchor. Location Start on a small ledge in the wet corner. Protection 4 bolts and quick clips to lower off FA: Daniel Alacoque, Jun 2021 | 5.10a | 12m, 4 | |||||
| 6 |
'round The Bay
Description Climb the arête and veer slightly right to climb the face after clipping the second bolt. Link into Gee I'm a Tree at the large horizontal ledge. Location Starts at the bulbous arête between Weeping Angles and Gee I'm a Tree. Protection 5 bolts and quick clips to lower off FA: Trevor Harris, Aug 2021 | 5.11b | 15m, 5 | |||||
| 7 |
★★ Gee I'm A Tree
Description Starting from the big rounded jug head up and left following jugs through some fun and awkward moves with a crux near the end. Location Starts just to the left of Trihardral. Protection 7 bolts and quick clips to lower off FA: Phil Stennett | 5.9 | 18m, 7 | |||||
| 8 |
★ Trihardral
Description Start on a small chest height ledge under a bulge. Pull the bulge and follow the line of four bolts to a unique corner feature with a thin crack at the back. Climb this (crux) up to a right angling hand crack then pull a few scrappy moves to gain the anchor. Location Right end of Geometry Wall. Protection 4 bolts + standard rack. Good pro the whole way. FA: David Bruneau | 5.11a | 17m, 4 | |||||
 |
||||||||
| Route | Grade | Style | Selected ascents | |||||
| 9 |
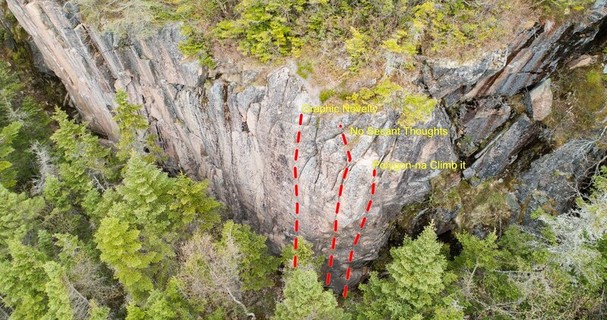
Graphic Novelty
Description Easy climbing through a series of book-shaped blocks leads to the crux: novel moves to transition from face climbing to an insecure hand jam. Location Start on a low ledge between Trihardral and No Secant Thoughts. Take care to leave the crag Bonsai tree untouched. Protection 5 bolts to a rap anchor FA: Lewis Loader, May 2021 | 5.12a | 12m, 5 | |||||
| 10 |
No Secant Thoughts
Description Climb fun juggy holds up to the prominent roof and pull strenuous moves over the lip of the roof. Commit to the 5.11 climbing and avoid second thoughts to reach the anchor. Location Immediately to the left of Polygon-na Climb it. Climbs up the steepest section of roof. Protection 5 bolts and a rap anchor FA: Lewis Loader, Oct 2021 | 5.11a | 12m, 5 | |||||
| 11 |
★★★ Polygon-na Climb it
Description Pull through a couple large ledges to the base of the dihedral halfway up the wall. Make some big moves on jugs to reach the anchor. Location This is the last route to the right on the Geometry Wall. Start by pulling yourself up to the large ledge. Protection 5 bolts and quick clips to lower off FA: Erica Harvey, Oct 2020 | 5.8 | 12m, 5 | |||||
1.2. Tiger Wall 13 routes in Cliff
- Summary:
-
Mostly Sport climbing
Lat / Long: 47.883423, -54.189455
description
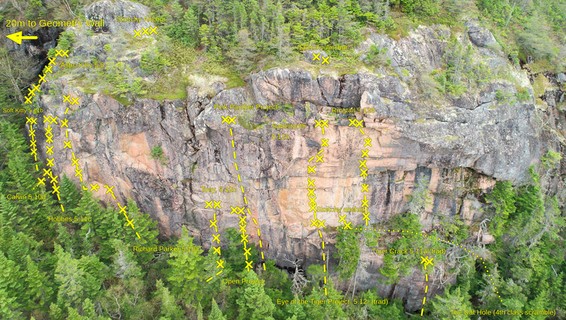
This wall has two distinct sections of crack and face climbing broken up by the "Cat Walk" ledge. The first is a shorter but very overhung wall and the second is longer and has sections that are overhung and closer to vertical as well as a huge roof feature. The "Cat Walk" ledge is accessible by climbing a route on the first section or scrambling up the Cat Hole. There are a number of strange rappel anchors of unknown origin placed above the cliff (and one on the Cat Walk ledge), use these with caution as some are placed in dubious features; the one in the small, undercut boulder may be the worst one.
approach
Follow the main trail from the point it reaches the woods until you can just about make out the face on your left then make a sharp turn onto a smaller trail to reach the base of the wall. Orange trail tape marks the trail from the entrance of the wood all the way to the crag.
 |
||||||||
| Route | Grade | Style | Selected ascents | |||||
|---|---|---|---|---|---|---|---|---|
| 1 |
★ Astro Kitty
Description Fun slab climb with closely spaced bolts. A great first lead. Climb straight up from the first bolt to the top. Location On the Climbers right side of the slab in the gully between Tiger Wall and Geometry Wall. Protection 6 bolts, lower off anchor FA: Ania Polak | 5.6 | 14m, 6 | |||||
| 2 |
Soft Kitty
escription Short but intense. Balancy start leading to some nice juggy flakes with tricky footwork. Protection 3 bolts, anchor. Stick clip the high first bolt. FA: David Bruneau, 2022 | 5.11b | 11m, 3 | |||||
| 3 |
Calvin
Description I recently moved many of the bolts on this route, now there are no runouts, the clipping stances are good and the bolt line runs straight. Should be good for people breaking into the grade now! Climb a series of big, flat holds up and right then move right to the base of a layback crack/feature. Climb this past more bolts to a sloping ledge and to the top. This route joins "Hobbes" at the second bolt (the glue-in) Protection 6 bolts, top anchor with rap hardware FA: David Bruneau | 5.10d | 15m, 6 | |||||
| 4 |
Hobbes
Description Excellent sport line up unique features. This route takes the right start of the two close lines of bolts. Climb a series of slanting undercling rails to a layback crack/feature. Clip the glue in bolt to the left. Climb this past more bolts to a sloping ledge and to the top. From the third bolt (glue in) onwards is shared with Calvin Protection 7 bolts + anchor, shared with "Calvin" FA: Sarah Spurrell | 5.11c | 15m, 7 | |||||
| 5 |
★★ Richard Parker
Description Path of least resistance up the left side of Tiger Wall through some really interesting features. Start by climbing the ramp past 3 bolts to its top, then traverse left along the sloping ledge (added a bolt here 9/07/2016) to clip a bolt on the overhanging arete. Climb straight up the arete, avoid a roof by climbing to the left of it and then up the face above. Top out straight above the last bolt. Be aware of potential for rope drag on the way down. Best to have someone follow this on toprope, or lower through the anchor carefully to clean it due to swing potential. Location Right side of Tiger Wall. Gets you to the top of tiger wall for easy access to the Tiger Slabs above. Protection 8 Bolts + anchor with Rappel Hardware FA: David Bruneau/Tyler Blacquiere | 5.10a | 20m, 8 | |||||
| 6 |
Tony
Description Traverse in from the left along big holds and then go straight up the face. Sustained power endurance climbing with surprisingly great movement and very comfortable holds. Protection 4 Bolts, anchor FA: David Bruneau (Equipped with help from Daniel Alacoque & Kevin Le Morzadec) | 5.12c | 12m, 4 | |||||
| 7 |
Tiger Wall project
Description Begin strong with a bouldery start to gain a jug 10 feet off the ground. Continue up on side pulls and slopers to another jug halfway up the wall next to the block. Finish with hard compression moves and a huck to the final hold. This has not been sent yet and is an open project. Location Start just left of Pink Panther Protection 5 bolts to a rap anchor | 5.13 | 14m, 5 | |||||
| 8 |
The Pink Panther
Description Follow the pink streak past the no-hands rest to the very top of the wall. Mega pitch! Location Start in the dihedral to the right of Tony Protection 13 bolts and a rap anchor. This route is equipped with a perma-draw to reduce the swing when cleaning. FA: Equipped by Daniel Alacoque | 5.12+ | 26m, 13 | |||||
| 9 |
Eye of the Tiger Project
Description Starts as a finger crack with very tricky moves as the crack gets thinner towards the top. Very overhung. Waiting for a first ascent! Protection Standard rack with emphasis on small gear. Anchor on the wall at the back of the ledge. | 5.12+ | 12m | |||||
| 10 |
Sabertooth
Description Varied endurance climbing with no stopper moves. This route dries out very quickly due to it's sunny and exposed location, and is a good option if the Geometry Wall is wet, and may be a good late season option. Stick clip the first bolt off the ledge, the moves off the ledge are tricky. Location On the "Cat Walk" ledge, immediately above the "Eye of the Tiger" project. Anchor your belayer on the "Eye of the Tiger" fixe ring anchor, or the bizarre anchor to the right. Protection 7 Bolts, Anchor FA: David Bruneau | 5.12a | 17m, 7 | |||||
| 11 |
Ringtail
Description Straightforward vertical climbing leads to a difficult bulge and some more hard moves to the anchors. Approach via the Cat Hole scramble. Protection 7 Bolts, anchor. Anchor your belayer on the ledge, there is a bolt here for this purpose FA: David Bruneau | 5.12d | 18m, 7 | |||||
| 12 |
Tiger Crack
Description Start in double cracks at the bottom and trend slightly left following the crack as it widens in pods before the finish. Protection Standard rack with some bigger gear (up to #5 camalot). Bolted anchor. FA: David Bruneau | 5.11a | 12m | |||||
| 13 |
The Cat Hole
Description This is a scramble that can be used to access the ledge in the middle of Tiger Wall. The initial steep part has been fitted with short fixed ropes so you can self belay or just pull yourself up on the handline. From the top of the steeper section, you can walk along the whole ledge, which is at least 6 feet wide and can be done unroped. From this ledge you can continue up the routes that start from the ledge, or toprope the routes on the lower half. Location 20m Climber's right of Tiger Crack, look for a bolt at the base of a short ramp. Protection Fixed lines, bolts, trees | Class 4 | 9m | |||||
1.3. Tiger Slabs 7 routes in Cliff
- Summary:
-
Trad climbing and Sport climbing
Lat / Long: 47.883756, -54.189301
description
Above the Tiger Wall there is a slab wall with great quality rock and really interesting curve and bulge features as well as cracks. The section above the lower wall has the most interesting features but is a little shorter and the wall gets bigger as it curves around the corner to the right.
The easiest way to access the top of the wall is by Tiger Woods (5.8 trad), but you can also use Speaking of Curvature (5.10a sport) and from the top of any route you can access all top ropes.
approach
From Tiger Wall walk right, along the base until reaching the end and then go uphill trending slightly left until you reach a small face (10ft tall). Go left from this and up the steep slope to the base of the Slabs. From the base you can go left to the area above Tiger Wall or right to rest of the slabs
| Route | Grade | Style | Selected ascents | |||
|---|---|---|---|---|---|---|
| 1 |
Angles, Fractions and Maps
Description Immediately to the left of Speaking of Curvature climb the line of bulges straight up towards the blank face and roof. One reachy, powerful move lets you reach right along the base of the roof to get to the ledge and the topout shared with Speaking of Curvature. Protection The line will need a couple of bolts (and some cleaning!) to be lead, but can be top roped from the anchors on Speaking of Curvature. | 5.10d | 15m | |||
| 2 |
★★ Speaking of Curvature
Description An exciting route through really interesting curves and features up the wall. Start on the huge jug and smear to get your feet up and stand in the gully. Work your way up through a crux at the first bulge to more good holds and a rest before a last few physical moves to gain a small ledge and then make the topout. Protection 5 Bolts and top anchor - with no rappel hardware! Possibly clean off a tree, or scramble right to the rappel anchor of the next route over. FA: Ryan Brushett | 5.10a | 18m, 5 | |||
| 3 |
★★ Served By Destiny
Description Suggest Change A fantastic route up the striking crack feature in the wall that protects perfectly. Start on the right side of the wall on the rock slope and make a balancy step up onto a small ledge. Traverse this ledge a couple of feet left to reach the good jugs. From the jugs climb straight up to the horizontal and then into the crack above. Climb the crack through the crux to reach up to the good holds under the block. Climb over the block and top out to the anchor. Protection Suggest Change Gear to 1" and top anchor with rappel hardware. The block at the top is solid to use as holds but it is probably best not to place gear around it, there are other options anyway. FA: Phil Stennett | 5.10c | 18m | |||
| 4 |
Destiny's Child
Description A variation to the start of Served By Destiny. Climb the diagonal crack starting on the very right hand end of the wall to meet up with the crack on the original route. Getting into the crack is probably the crux depending on your height! Protection Gear to 1". Anchor with rappel gear on top. | 5.11a | 18m | |||
| 5 |
Fairy Forest
Description The first section of this climb is a lot of fun and makes the route worthwhile on it's own. After that it is just a scramble to the top. Climb the distinctive crack in the corner up to a large flared seam past the bulge before gaining a good ledge. From the ledge scramble up to another ledge. From the ledge either climb a short but fun ramp to reach the trees at the top which also are the anchor for Tiger Woods. Or move around the corner to the left to reach the anchors on the top of the routes on the other side. Location From the ledge around the corner, immediately before Tiger Woods. Protection Gear to 3". Tree anchor at the top of the route. FA: Phil Stennett | 5.9 | 18m | |||
| 6 |
★★ Tiger Woods
Description A really fun route on good rock with great protection. Also a great way to access the top of the crag if you want to set top ropes on other routes. Climb up the ramp to the right until you reach the double crack system with a tree. Climb around the tree and up the cracks and around the block until you reach a small ledge. From the ledge climb the finger cracks to the top. Location Slightly around the corner to the right from the face above Tiger Wall. Start on the ledge next to the obvious ramp. Protection Gear to 2" and a tree at the top serves as anchor. FA: Phil Stennett | 5.6 | 21m | |||
| 7 |
Earn Your Stripes
Description There is an excellent hand crack starting half way up the Tiger Slab. Directly below it is very blank. To get to the crack, start 20 feet right of the crack up a shallow corner for about 30 feet, until the obvious horizontal crack. Traverse left for 20 feet along this horizontal past a block (solid to hold, not for gear) to the base of the hand crack. Climb the hand crack through a break. When the crack peters out, exit to the right via reachy moves. Location Up another rough trail past the other routes on Tiger Slab. Protection Standard rack to 4 Camalot. Double up on 75, 1 and 2 Camalot if it's at your limit. Excellent Pro. Top anchor is a tree at the lip of the cliff, there is a bit of rope and a mallion in place as a rap station. The rap station is roughly half way between the start and finish of the route so the route can be cleaned on rappel or toproped without a dangerous swing. FA: David Bruneau | 5.10b | 23m | |||
1.4. Halfway Wall 0 routes in Cliff
approach
From the base of the Tiger Wall follow the trail to the right before reaching the end of the cliff and then take the trail up the hill and trending right to reach the lower end of the wall. Orange trail tape leads all the way from the entrance to the woods, past the Tiger Wall to this area.
1.5. Weather Wall 7 routes in Cliff
- Summary:
-
Trad climbing and Sport climbing
Lat / Long: 47.884219, -54.186710
description
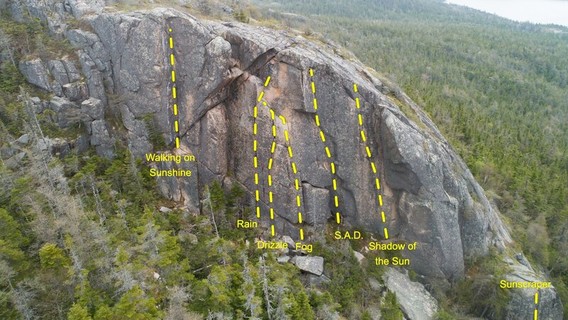
The most exposed of the Swift Current areas, closer to the top of the hill and away from the trees a little more. The view is beautiful and it is a good spot if it has been wet as it dries much quicker, but the rock isn't quite as good quality as the lower areas. The routes are fun never the less and it is well worth the longer hike in.
The top of the crag can be accessed via a 5.8 sport route or an easy scramble up blocks on the left side of the wall so that top ropes can be set on other routes.
approach
From the Halfway Wall continue up the hill to reach a small clearing on top. There is a trail leading from the back of the clearing through the woods to the wall. The trail is marked with orange tape all the way from the entrance of the woods past Tiger Wall and Halfway Wall up to the face.
 |
||||||||
| Route | Grade | Style | Selected ascents | |||||
|---|---|---|---|---|---|---|---|---|
| 1 |
★★ Walking on Sunshine / Julyuary
Description Previously known as "Julyuary" this climb has seen development in 2021 with the addition of bolts, and has been renamed by the FA. Beginning from the ground below the quartz dihedral, climb the short corner to a small ledge, then continue stemming up the corner to the anchors. Protection 8 bolts plus anchor with rappel hardware, also a top accessible anchor for top roping - not equipped with rappel hardware. FA: Kat Flynn | 5.8 | 18m, 8 | |||||
| 2 |
Rain
Description Climb straight up the crack onto the ledge and top out between the roof and the large perched boulder. Protection Two bolts on top. FA: Ryan Pierce/Lewis Loader | 5.9 | 15m | |||||
| 3 |
★★★ Drizzle
Description Climb the crack and break right into the other system when you can. From the ledge do a couple of balancy moves past the very hollow sounding flake before topping out between the roof and the perched boulder. Protection Two bolt anchor on top FA: Daniel Alacoque | 5.9 | 18m | |||||
| 4 |
Fog
Description Start around the corner from Rain and Drizzle right next to the boulder at the start of S.A.D. Climb the crack and meet up with the top of the other two routes on the ledge. Protection Two bolt anchor on top. FA: Lewis Loader/Ryan Pierce | 5.9 | 18m | |||||
| 5 |
S.A.D.
Description Start on the right hand side of the boulder and do a few balancey moves to reach the top. From the boulder gain the corner to the right and follow this up until you can transfer into the hand crack going through the roof. Pull the roof crack and top out up the crack. Protection Two bolt anchor on top. | 5.11a | 18m | |||||
| 6 |
★★ Shadow Of The Sun
Description Start either on the jug slightly left of the first bolt or in the chimney slightly to right and pull the tricky first moves. From there move up and left through good holds all the way to the top. There are a couple of big reaches for shorter people but there is always a way around without making it much harder. The big loose block marked with an X on the topo has now been removed. Protection 6 bolts and 2 bolt rappel anchor on top. FA: Aaron Casey | 5.9 | 18m, 6 | |||||
| 7 |
Sunscraper
Description An obvious crack splitting the large boulder making up the right hand base of the weather wall. The crack starts out with a couple of hand jam sized moves but soon progresses into chicken wings and arm bars. Good fun to get a taste of wide cracks, but not long enough to be a great route. Location From the large flat boulder at the base of the other climbs scramble down to the ground. Scramble up again to the left to reach the top anchors which are at roughly the same height as the first boulder, or walk down the hill to the start of the route. Protection Might protect with a 6" cam, but I think it is wider than that! Two bolt anchor on top. FA: Lewis Loader | 5.7 | 6m | |||||