A Crag Guide gives an extensive view of all sub areas and climbs at a point in the index. It shows a snapshot of the index heirachy, up to 300 climbs (or areas) on a single web page. It shows selected comments climbers have made on a recently submitted ascent.
At a minor crag level this should be suitable for printing and taking with you on a climbing trip as an adjunct to your guidebook.
This guide was generated anonymously. Login to show your logged ascents against each route.
Warning
Rock climbing is extremely dangerous and can result in serious injury or death. Users acting on any information directly or indirectly available from this site do so at their own risk.
This guide is compiled from a community of users and is presented without verification that the information is accurate or complete and is subject to system errors. By using this guide you acknowledge that the material described in this document is extremely dangerous, and that the content may be misleading or wrong. In particular there may be misdescriptions of routes, incorrectly drawn topo lines, incorrect difficulty ratings or incorrect or missing protection ratings. This includes both errors from the content and system errors.
Nobody has checked this particlular guide so you cannot rely on it's accuracy like you would a store bought guide.
You should not depend on any information gleaned from this guide for your personal safety.
You must keep this warning with the guide. For more information refer to our:
Usage policy
Contributors
Thanks to the following people who have contributed to this crag guide:
Martijn van Eijkelenborg
Brendon Flanagan
Wall
lee cossey
Lee McDougall
Eliezer
Vanessa Wills
John
Radka
Brendan Heywood
The size of a person's name reflects their Crag Karma, which is their level of contribution. You can help contribute to your local crag by adding descriptions, photos, topos and more.
Some content has been provided under license from: © Australian Climbing Association Queensland (Creative Commons, Attribution, Share-Alike 2.5 AU)
Table of contents
- 1.
Bondi
40 in Crag
- 1.1. The Main Wall 17 in Cliff
- 1.2. Bondi Bouldering 23 in Crag
- 2. Index by grade
1. Bondi 40 routes in Crag
- Summary:
-
Bouldering, Trad climbing and other styles
Lat / Long: -33.891555, 151.284495
description
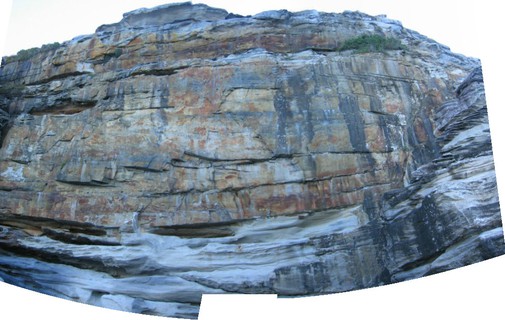
Bondi is a big and serious crag for Sydney standards. It doesn't have much in the way of easy routes and has difficult access to boot. Despite this it's definitely worth a visit since the rock on the main wall is some of the best on the sea cliffs. Some recent rebolting has made the best of the routes leadable again.
access issues
If you have benefited from climbing infrastructure in NSW, please consider making a donation towards maintenance costs. The Sydney Rockclimbing Club Rebolting Fund finances the replacement of old bolts on existing climbs and the maintenance of other hardware such as fixed ropes and anchors. The SRC purchases hardware, such as bolts and glue, and distributes them to volunteer rebolters across the state of New South Wales. For more information, including donation details, visit https://sydneyrockies.org.au/rebolting/
approach
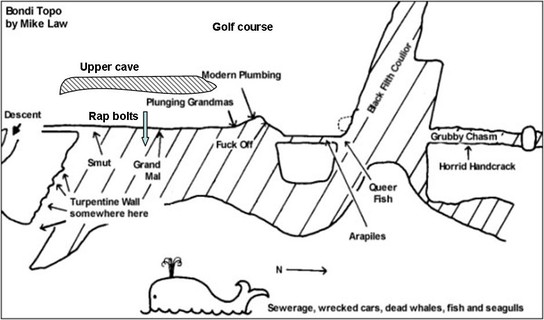
The crag is located a few minutes drive past the northern point of Australias famous Bondi Beach and can be found directly east of the intersection of Wallis St and Military Rd.
Park as close to the Bondi Golf and Diggers club house as you can. Grab your gear and make your way around the southern end of the golf course between the greens and the wooden fence line. This will bring you out to the edge of the cliff where you'll find a large rock platform you can walk out on to. Head north of the rock platform following the cliff line and the goats trail through the knee high grass for approx 20 meters where you'll find an overhang/cave. This is the top of the main wall and where most of the action can be found.
Bondi is truly an amazing place to climb so avoid walking across the fairways or greens as we don't want to annoy the golfers and have our access banned, or worse, have a golf ball hit a strolling climber on the noggin. FORE!!!
The original descent gully is down the aptly named "Black Filth Couloir" just north of the main wall. Many people take one look at it and rap in instead. Rapping in is much safer, enjoyable and quicker. There are 2 sets of double bolt belay's spread out over the top of the main wall. One set at the southern end, one in the middle and a lone single bolt at the northern end. There's also a set of double bolt belays about 15 meters north of the main wall which are the anchors for Arapiles. All anchor points require double 50m ropes, although it's probably better to fix one rope, rap in and lead out on a second. All carrots are in excellent condition.
There's also one set of double bolt belay's on the southern end of the rock platform you first come across when arriving at the crag. These bolts are in excellent condition and are there for an unknown project.
If you and your climbing party decide not to rap in or climb out there's another descent gully between the grass and the rock platform south of the main wall. You'll find a single ring bolt about 15 meters down into the southern descent gully on the left hand side. This is ideal for setting up an access rope which is highly recommended when either going down or coming up this access trail. From the bottom of the southern access gully it's a cautious walk north back to the main wall.
A few people have said "I should've brought my swimmers along". NOT A GOOD IDEA. The ocean has easy access at this crag and as tempting as it is you don't want to risk being smashed against the rocks by the surging ocean. The Westpac rescue helicopter is not the best way to exit a crag. Remember folks, Australias most famous beach is only a 2 minute drive down the road from here so best to slip slop slap and go swim between the flags.
Climbs are described left to right facing the cliff.
Chalk up, climb on and live the dream!
1.1. The Main Wall 17 routes in Cliff
- Summary:
-
Trad climbing, Sport climbing and Top roping
Lat / Long: -33.888529, 151.285564
description
The Main Wall is where majority of the action can be found at Bondi. The top of The Main Wall is protected by an nice overhang which can protect all your climbing party and gear from mother nature and any misguided golf balls. It also provides an ideal location for lunch with amazing views.
All the good routes on this wall were retrobolted a few years back. Ring bolts are the flavour of this crag although you still might want to bring some bolt plates for the remaining routes that still have carrots.
The Main Wall consists of some of the best sea side climbing in Sydney and the condition of the rock is brilliant.
The evident rock platform that you first come across when you arrive to the cliff line via the southern approach route to the crag.
The Northern Aspect of Bondi contains some decent climbs and is where the sensational chimeny can be found.
Either rap in off the main wall, make your way to the shore line and then head north or rap in off the anchors for Arapiles.
approach
To get to the base you can either rap in off the carrots at the top of the main wall or enter via the southern access gully.
Head north from The Main Wall for about 15 meters, head to the edge of the cliff line, drop down two tiers and you'll find the spaced out carrots for Arapiles anchors.
Alternativley rap in from The Main Wall, walk around the point and head north.
  |
||||||||
| Route | Grade | Style | Selected ascents | |||||
|---|---|---|---|---|---|---|---|---|
| 1 |
Turpentine Wall
Start somewhere in the middle of the wall left of the chimney. Up the crumbling horror show. Maybe 24 R xxx FA: David Wagland 1980s, 2000 | 16 X | 35m | |||||
| 2 |
Smut
Start just right of chimney at the southern end of main wall. Start: Up choss chimney for a few moves, then right onto ledge. Clip ringbolt and overcome horrible undercut section on crimps to break. Straight up sandy wall (scary) to left facing juggy flake. Above this head right and finish up Daylight Shaving. FA: Michael Law, 1980 | 20 R | 35m, 1 | |||||
| 3 |
★★ Daylight Shavings
Horrible start but gets nicer the higher you go. Start: Start as for Smut. From the horrible undercut move at the first bolt traverse right across horizontal break and up wall and subtle groove on great rock. For a more enjoyable climb just pull on the first bolt (grade 20). FA: N Monteith | 22 | 25m, 8 | |||||
| 4 |
★★ Grand Mal
Sustained and pumpy climbing which gets better the higher you go. Rebolted, chipped and straightened out for the 21st century. Start: Starts in the middle of the main wall. FA: Mike Law 1980s, 2000 | 24 | 40m, 8 | |||||
| 5 |
Plunging Grandmas
The name says everything about the history of this climb! Start on the last conceivable piece of rock on the right side before it undercuts and turns to choss. Was originally led in two pitches?! Rebolted 2008. Start: Up and left past RB then jugs to big ledge. Over rooflet, a bit right then back left to gain left facing small corner. At the top of this blast straight up the face above to lower-off. Original route headed left from the small corner and up past some 'interesting' fixed pegs that are still visible. FA: Mike Law, Charlie Creese & Warwick Baird 1980s, 2000 | 26 | 25m, 7 | |||||
| 6 |
Electric Eel
A left hand variant finish for Plumber's Mate. Needs a rebolt for the upper half. From flake after traverse head left and follow line of rusty BRs to rap point. | 23 R | 25m | |||||
| 7 |
★ Plumber's Mate
One of the best single sport routes on the sea cliffs? Sustained and interesting face climbing on excellent rock. Starts on right side of main wall at the line of shiny new u-bolts. Thin slippery start to jug, up small arete to long reach (sling) then hand traverse wildly left to gain flake and final sustained face finish. Because this route doesn't get much traffic it is highly recommended you rap this route first and brush the sand/salt that accumulates on the holds. FA: Giles Bradbury 1980s, 1986 | 23 | 15m | |||||
| 8 |
★★★ Modern Plumbing
Needs a rebolt. Start 4m right of PM, at shallow corner. Head straight up corner (3 BRs), then step down 2m and traverse left for 3m. Head up and right past 2 more BRs then left to belay (possible to rap off from here). Pitch 2 is possible for another 15m (scary). FA: Giles Bradbury 1980s, 2000 | 23 R | 40m | |||||
| 9 |
Fuck Off
Needs a rebolt. A dirty black wall. Start about 5m right of Plumbers Mate. Delicately up slab (2 rusty BRs). Take care with rock and pro. FA: 1984 | 20 R | 15m, 2 | |||||
| 10 | Unknown project | 40m | ||||||
| 11 |
★ Metamorphosis
Starting 5 meters left of Arapiles inside the chimney, follow the line of BR's up. Pro in decent condition. Can link up with 2nd pitch of Arapiles. | 22 | 45m | |||||
| 12 |
★ Arapiles
On the left of the chimney that forms the left side of the block left of the wall. You'll see 2 RB's (with matching carrots) which are the start of the climb. When you reach the "cute" crack above it's time for trad. There are double u bolts approx 25 meters into the climb which are in very good condition. FA: Mike Law, 1936 | 18 | 45m, 2, 2 | |||||
| 13 | Queer Fish | 20 | 18m | |||||
| 14 |
Old Vic
FA: Adrian Philbey, 1996 | 18 | 25m | |||||
| 15 | Who Cares | 21 | 15m, 5 | |||||
| 16 |
Horrid Handcrack
handcrack on east wall of chasm 30m north FA: Michael Law, 1973 | 18 | 20m | |||||
| 17 |
★★ Sydney Sea Cliff Traverse - North Bondi
Sea Level Traverse - North Bondi (1.5km, Grade 12?) This southern section of coastline wraps it’s way around some glorious and beautiful ledge systems. It’s the easiest and least commiting of all the sections, with only one serious pitch of climbing. A great day out and a good adventure to bring a novice along. From the North: Start at The Murk (golf course) descent. Its possible to explore up to 500m north of this section without ropes. Heading south from the Murk, you will quickly arrive at the first crux. A short rope and some cams will see you around it no problem, depositing you into the Bondi Main Wall Sport crag. For an alternative entry point, or to escape, the gully on its south will help you out. Another 500m of straightforward rock hopping to the south gets you to the second and last crux of this section. Some stainless bolts would make rapping this much easier but for now either trust the old carrot or ask your partner to second the pitch (hint: it goes downwards). Once you work your way to the bottom it is an easy jaunt back to the beach. Try to do this at low tide, the rockpools here are phenomenal, the best of the entire traverse. From the South: From Bondi, begin your day on australia's most famous beach before diving immediately into australia's most beautiful rubbish dump. It’s pretty rough picking your way past the bogan hangouts but keep going, you just need to walk further than someone with a case of beer would. You can skip a lot of easy rock platforms by scrambling down at ben buckler. About 200m past the enormous boulders you’ll come to an impasse. At super low tide its possible to get around without ropes, but to stay dry, a 10m little pitch of grade 12 trad climbing will get you though. Beyond this pitch, another 300m of easy scrambling gets you to the main wall / sport crag. Either scramble out here via the gully on its south, or continue past the next, straightforward crux to scramble out via the golf course descent. Bring a single rack of cams with extra in the #1-3 range, a 30m rope and a can do attitude. | 12 | 1500m, 2 | |||||
1.2. Bondi Bouldering 23 routes in Crag
- Summary:
-
All Bouldering
Lat / Long: -33.893303, 151.283980
summary
Some sea side bouldering just north of Bondi Beach.
description
Some of the boulders in this video are at North Bondi
approach
Park at Ray O'Keefe Reserve and go down the white stairs to the row boats. Go left, and walk around the corner to find a field of boulders.
history
A bunch of boulders have been established here in the past, but this info is not on the crag (yet). Apart from the Boulders with a photo topo, it is not clear whether the boulders listed here are actually in the area indicated on the map for this sector. Info anyone?
/1c/a0/1ca0d4c8feb55d5147057ef5eb9a772c6e808f4a) /8d/25/8d25c6339bbda1960d226a13228da601ffd94249) /6c/6f/6c6f856425f87cdaafd4a19cdb3a2eab0dd6ead5) |
||||||||
| Route | Grade | Style | Selected ascents | |||||
|---|---|---|---|---|---|---|---|---|
| 1 | ★★ Slab Obelisk | V1 | 4m | |||||
|
When you top out the Slab Obelisk you will see the next boulders in front of you. | ||||||||
| 3 | A | V2 | 3m | |||||
| 4 |
★★★ B
Sit start up the overhang on sloper pockets | V4 | 3m | |||||
| 5 | C | V2 | 3m | |||||
| 6 |
The High Ball
Start from sloper rail up into undercling, then easier ground to top out high up. FA: Martijn van Eijkelenborg, 14 Nov 2017 | V2 | 7m | |||||
| 7 |
Carbon Streak
Highball start from sloper rail up into undercling, then but split off to right and up the black streak. FA: martijn van eijkelenborg, 14 Nov 2017 | V2 | 7m | |||||
/a2/1d/a21df7a58b0070f10817dae7bc2fe7f38fd70157) /e5/df/e5df93a2e7bd40b9beea98c1f3b779a20ba0a734) |
||||||||
| Route | Grade | Style | Selected ascents | |||||
| 8 |
F
Traverse in to huge jug on lip. | V3 | 4m | |||||
| 9 |
★★★ G
From the sit. May have been done before. High finish. | V9 | 7m | |||||
| 10 |
★ H
Slab straight up above OBU$ | V1 | 5m | |||||
| 11 | I | V0 | 5m | |||||
| 12 |
★ J
FA: Martijn van Eijkelenborg, 14 Nov 2017 | V3 | 5m | |||||
/18/90/1890c80aa47903c22dca5eb360f554237e165224) |
||||||||
| Route | Grade | Style | Selected ascents | |||||
| 13 |
★★ Owen's Slopers
FA: martijn van eijkelenborg, 14 Nov 2017 | V4 | 3m | |||||
| 14 |
Owen Gibson
Start on the sloper marked Owen Gibson, move right and up. FA: martijn van eijkelenborg, 14 Nov 2017 | V5 | 3m | |||||
|
The following boulders are somewhere in Bondi, please add information if you have any. | ||||||||
| 16 | Fitness First | V8 | ||||||
| 17 | Fitness First Sit | V8/9 | ||||||
| 18 | Do You Know Fitness First | V9 | ||||||
| 19 | Do You Know Bandelei Chiba | V6 | ||||||
| 20 | The Best Of Farina | V6 | ||||||
| 21 | Rafa's V4 | V4 | ||||||
| 22 | Ocean's Splash | V7 | ||||||
| 23 | Ocean's Splash Sit | V9 | ||||||
| 24 |
Jellyfish
Traverse. | V8 | ||||||
| 25 | How Can I Move | V7 | ||||||