A Crag Guide gives an extensive view of all sub areas and climbs at a point in the index. It shows a snapshot of the index heirachy, up to 300 climbs (or areas) on a single web page. It shows selected comments climbers have made on a recently submitted ascent.
At a minor crag level this should be suitable for printing and taking with you on a climbing trip as an adjunct to your guidebook.
This guide was generated anonymously. Login to show your logged ascents against each route.
Warning
Rock climbing is extremely dangerous and can result in serious injury or death. Users acting on any information directly or indirectly available from this site do so at their own risk.
This guide is compiled from a community of users and is presented without verification that the information is accurate or complete and is subject to system errors. By using this guide you acknowledge that the material described in this document is extremely dangerous, and that the content may be misleading or wrong. In particular there may be misdescriptions of routes, incorrectly drawn topo lines, incorrect difficulty ratings or incorrect or missing protection ratings. This includes both errors from the content and system errors.
Nobody has checked this particlular guide so you cannot rely on it's accuracy like you would a store bought guide.
You should not depend on any information gleaned from this guide for your personal safety.
You must keep this warning with the guide. For more information refer to our:
Usage policy
Contributors
Thanks to the following people who have contributed to this crag guide:
Maximilian W M Keatinge
David Barnes
Brendan Heywood
mathew
Adam Rabjohns
Phil Ward
Gabriele G
Ryan Whelan
Graham Dowden
Rob Barker
The size of a person's name reflects their Crag Karma, which is their level of contribution. You can help contribute to your local crag by adding descriptions, photos, topos and more.
Einige Inhalte wurden unter folgender Lizenz bereitgestellt: © Australian Climbing Association Queensland (Creative Commons, Attribution, Share-Alike 2.5 AU)
Table of contents
- 1. Illawong 23 in Crag
- 2. Index by grade
1. Illawong 23 routes in Crag
- Summary:
-
Sportklettern, Klettern und traditionelles Klettern
Lat / Long: -34.004834, 151.042365
Übersicht
Easy access Variety of climbs well shaded in summer
Beschreibung
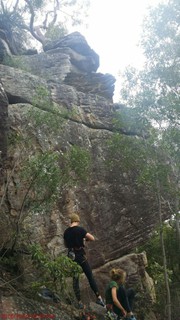
This has to be one of the easiest accessed cliffs in Sydney. A dozen very doable and well protected routes for the after work, suburban fix. Skin is a must do, if you can do it?
Einschränkungen
.
Zustieg
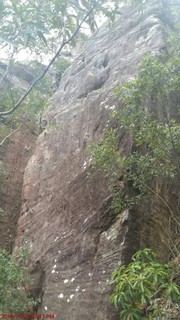
Drive about two thirds of the way down Redman Ave in 'Illawong'. Park opposite number 31. The cliff is located about 10m directly off the road, with descents at either end of the cliff
| Route | Grade | Style | Selected ascents | |||||
|---|---|---|---|---|---|---|---|---|
| 1 |
Butt Ugly with Gravy
Starts just right of the detached block, below a small, bulgy black wall. Up (RB and FH) to BB. | 17 | 7m, 2 | |||||
| 2 | Dykes on Bikes (project) | 20 | 9m | |||||
| 3 | Just Dance (project) | 23 | 9m | |||||
| 4 |
★ Pissing With the Wind
Start on block under low roof. Up and out the left hand side of the steep prow (3 FHs), then up the easy sandy slab above (dodgy BR) to double BB belay. | 18 | 10m, 4 | |||||
| 5 |
★ Let's Get Ripped
Really weird climbing. Up to first FH on PWtW, then follow flake right through sandy overhang (2 more FHs). Up the arete ridge to rejoin PWtW (BR to double BB belay). | 21 | 10m, 4 | |||||
| 6 |
★ Open the Pod Bay Door Hal
Start just round the corner of LGR off detached block. Chin undercut start and follow crack (3 BRs). First move is hard. Erstbegehung: S. Tullock & D. Stone, 2000 | 17 | 10m, 3 | |||||
  |
||||||||
| Route | Grade | Style | Selected ascents | |||||
| 7 |
★★ Skin
Best route at the crag! Start below left side of bulging, grey slab. Tenuous arete to start, then straight up the engaging slab above--tricky top out, slightly easier to left in shallow and narrow chimney. 3 FHs to single carrot (best to top out, rap from tree at back, or build anchor with v-long sling to carrot at top of Bulges). Erstbegehung: Dave Barnes | 21 | 10m, 3 | |||||
| 8 |
★ Bulges
Also excellent! Up right side of bulging slab. Use the arete to start then go left onto slab. 3 BRs to triple BB. | 17 | 10m, 3 | |||||
| 9 |
Shlonging the Nurse
Fun layback flake on trad gear. | 13 | 10m | |||||
| 10 |
★ Dodgy Bolt
Contrived but engaging. Follow 3 BRs (staying left of the crease) to a double BB belay up on top of the cliff (or lower off BRs on ledge 2m lower down). Start: 1m right of StN Erstbegehung: D. Stone & T. Pool, 1992 | 17 | 10m, 3 | |||||
| 11 |
★ Flaky
Up, staying just right of the crease (3 BRs to the same double BB belay). The first BR looks very dodgy. Start: 1m right of DB. Erstbegehung: D. Stone & T. Pool, 1992 | 16 | 10m, 3 | |||||
| 12 |
★ Troada
Stand up to face, then move right, following 4 BRs. Same belay as for DB and F. Start: As for F. Erstbegehung: P. Faill & D. Stone, 1992 | 15 | 10m, 4 | |||||
| 13 |
★ Troada Direct Start
Hand traverse the lip of the roof, then mantle up to join T. Start: As for T. Erstbegehung: Doug Smith, 1999 | 19 | 8m | |||||
| 14 |
A (Project)
Top rope only? Start: Right of T. | ? | 10m | |||||
| 15 |
★ Chicken Therapy
Start: Inside cave at left-hand corner crack. Follow crack all the way to roof (mid-sized cams), then out and up. DBB at top set back and to the right. Erstbegehung: Phil Ward, 2010 | 18 | 10m | |||||
 |
||||||||
| Route | Grade | Style | Selected ascents | |||||
| 16 |
★ Olympic Spirit
10m right of CT. Featured arete at right end of chossy cave with two FHs. Really fun steep climbing. Bonus lower-off chain. | 15 | 8m, 2 | |||||
| 17 |
★ Blood from the Territory
Up the slab (2 FHs) to BB. Start: Right of the right hand crack. Erstbegehung: David Barnes, 2000 | 15 | 8m | |||||
| 18 |
Breakfast Radio
Up short seam (dodgy micro wires), then up wall (FH) and arete to double BB. Start: Right side of arete. Erstbegehung: David Barnes, 2000 | 18 | 8m | |||||
| 19 |
B
Up the crack (BR near top), over small roof to chain lower off. Start: Below incipient corner crack. | ? | 10m | |||||
| 20 |
Angel 125
Up the crack then out steep section (2 FHs) to double BB. Start: 6m right of B, below vague crack. Erstbegehung: David Barnes, 2000 | 16 | 10m | |||||
| 21 |
Just Dance (open project)
Up DOB to FH, then move right following the seam (wires, mid size cam and FH). Up to double BB. | 9m, 2 | ||||||
| 22 |
★ Dykes on Bikes
Cool features. Below the right hand side of the next arete to the right. Onto wall (FH) and left to the dyke (FH). Up (mid size cam) to double BB. Erstbegehung: Dave Pastafarian, 16 Mai 2020 | 21 | 9m, 2 | |||||
| 23 |
All Fours
A boulder problem starting on small block and traversing right to finish in flake in roof. Located below start of PWW. | V3 | ||||||
2. Index by grade
| Grade | Stars | Name | Style | Pop | |
|---|---|---|---|---|---|
| 13 | Shlonging the Nurse | 10m | |||
| 15 | ★ | Blood from the Territory | 8m | ||
| ★ | Olympic Spirit | 8m, 2 | |||
| ★ | Troada | 10m, 4 | |||
| 16 | Angel 125 | 10m | |||
| ★ | Flaky | 10m, 3 | |||
| 17 | ★ | Bulges | 10m, 3 | ||
| Butt Ugly with Gravy | 7m, 2 | ||||
| ★ | Dodgy Bolt | 10m, 3 | |||
| ★ | Open the Pod Bay Door Hal | 10m, 3 | |||
| 18 | Breakfast Radio | 8m | |||
| ★ | Chicken Therapy | 10m | |||
| ★ | Pissing With the Wind | 10m, 4 | |||
| 19 | ★ | Troada Direct Start | 8m | ||
| 20 | Dykes on Bikes (project) | 9m | |||
| 21 | ★ | Dykes on Bikes | 9m, 2 | ||
| ★ | Let's Get Ripped | 10m, 4 | |||
| ★★ | Skin | 10m, 3 | |||
| V3 | All Fours | ||||
| 23 | Just Dance (project) | 9m | |||
| ? | Just Dance (open project) | 9m, 2 | |||
| A (Project) | 10m | ||||
| B | 10m |