Saisonalität
Einschränk. übernommen von Yellowwood
Ethik übernommen von Yellowwood
The prevailing ethic for Yellowwood is tread lightly.
"Tread lightly" means no bolting of belay stances unless all possible alternatives have been completely exhausted. No placing of bolts for running belays that are not absolutely essential. No use of pitons, unless necessary. No use of power drills is accepted!
Climbers are asked to respect the prevailing ethic which is intended to preserve the aesthetic appeal of Yellowwood as a world-class Trad climbing destination.
It is essential for first time visitors to do an ascent of one of the existing classic trad routes to appreciate the committing and adventurous nature of the climbing at Yellowwood. Older routes such as Armageddon Time (and the direct), Blood is Sweeter than Honey and Time Warp are all test pieces for their grade. And newer routes such as Prime Time (and the direct) and Fantastic Time as well as "routes in progress" of which there at least 3, are no less demanding at the grade. Most, if not all the trad routes on the main wall have at least one "R" (run-out) pitch but none are "X" rated. There is minimal fixed gear and very few fixed stance
A new route on Yellowwood, Fighting The Dark Side Of Gravity, has had all its bolts removed, except for two that are essential for the leader on Pitch 3. Two non-essential pitons have also been removed.
There has been much debate about Yellowwood and the most active Yellowwood climbers have talked extensively so as to settle the ethos of this high-value cliff.
In a recent meeting Adam Roff, Jeremy Samson and Hilton Davies distilled the following:
Yellowwood is a very special Trad climbing venue and there have been some mis-steps in route development at the crag. Newborn was bolted many years ago before locals had given much thought to bolting and ethics. It is a legacy that shall remain, but should not be seen as guidance for route development at Yellowwood. More recently four new routes have been established by visitors who have made extensive use of non-essential bolting. Whilst route development is encouraged, non-essential bolting is not; and these new routes are getting their non-essential bolts removed. They will remain as good adventurous routes.
2014: There have been no less than 10 new multi-pitch trad routes established at Yellowwood in the first 5 months of this year. Together they constitute no less than 60 pitches or, combined, more than 1500m of climbing. All the routes have been free-climbed with the vast majority of the pitches of being moderate grade and only 2 pitches of grade 22 and one of grade 24. The routes are all well protected and no fixed gear was necessary.
Tags
Plane deinen Trip
Hallo!
Das erste Mal hier?
theCrag.com ist eine Plattform für Kletterer, die gratis Kletterführer und Informationen für Gebiete auf der ganzen Welt anbietet. Diese werden von Kletterern, Boulderern und anderen netten Personen erstellt und gepflegt.Du kannst deine Begehungen erfassen, dich mit anderen Kletterern austauschen und vieles mehr machen...» schnuppere hinein, » erfahre mehr oder » frag uns einfach


Unterkünfte in der Nähe mehr Verbergen
Inhalt teilen
Fotos Durchsuche alle Fotos

Cormac Tooze in ★★★ White On The Right 19 - 0b3d7f7a-3a03-4a4e-82f2-5d5b635b6336.jpeg
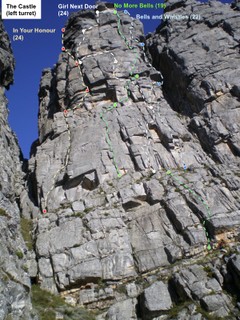
The Castle - Left Turret.jpg

The Castle - The Castle.jpg

Cormac Tooze in ★★★ White On The Right 19 - 67989094-b572-46eb-a4c2-6137fbcbe5bd.jpeg
Mi 31 Mai
Finde heraus, was in The Castle passiert.
Erhalte einen detaillierten Einblick mit einer Zeitleiste, die zeigt
- Begehungen von Kletterern
- Diskussionen in der Community
- Aktualisierungen des Indexes durch unsere Benutzer
- und viele weitere Dinge.
Logge Dich ein, um die Zeitleiste zu sehen!