A Crag Guide gives an extensive view of all sub areas and climbs at a point in the index. It shows a snapshot of the index heirachy, up to 300 climbs (or areas) on a single web page. It shows selected comments climbers have made on a recently submitted ascent.
At a minor crag level this should be suitable for printing and taking with you on a climbing trip as an adjunct to your guidebook.
This guide was generated anonymously. Login to show your logged ascents against each route.
Warning
Rock climbing is extremely dangerous and can result in serious injury or death. Users acting on any information directly or indirectly available from this site do so at their own risk.
This guide is compiled from a community of users and is presented without verification that the information is accurate or complete and is subject to system errors. By using this guide you acknowledge that the material described in this document is extremely dangerous, and that the content may be misleading or wrong. In particular there may be misdescriptions of routes, incorrectly drawn topo lines, incorrect difficulty ratings or incorrect or missing protection ratings. This includes both errors from the content and system errors.
Nobody has checked this particlular guide so you cannot rely on it's accuracy like you would a store bought guide.
You should not depend on any information gleaned from this guide for your personal safety.
You must keep this warning with the guide. For more information refer to our:
Usage policy
Contributors
Thanks to the following people who have contributed to this crag guide:
Kieran Loughran
Campbell Gome
Luen Warneke
Will Vidler
Phil Laukens
Dave Scarlett
Matt Brooks
Andrew Clark
Alex Holroyd
Nathan Murdoch
The size of a person's name reflects their Crag Karma, which is their level of contribution. You can help contribute to your local crag by adding descriptions, photos, topos and more.
Some content has been provided under license from: © Australian Climbing Association Queensland (Creative Commons, Attribution, Share-Alike 2.5 AU)
Table of contents
- 1. Siren Area 7 in Cliff
- 2. Index by grade
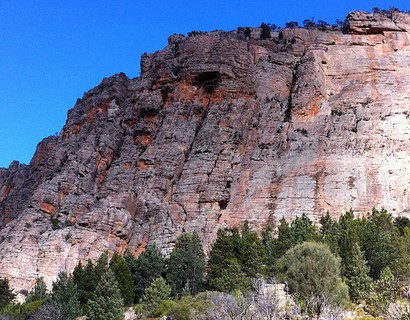
1. Siren Area 7 routes in Cliff
- Summary:
-
All Trad climbing
Stick to the paths.
Don't disturb the wildlife.
Routes near peregrine falcon nesting sites are closed in the spring.
Minimise the impact of your camping (fuel stoves not fires, take your rubbish with you, etc).
description
Emergency Location: Mount Arapiles, Pinnacle Face / Tip Toe Ridge Area
access issues
Cultural heritage closures now apply to some parts of Arapiles. This advice continues to evolve and may not be fully reflected in this website; refer to Parks Victoria for details applicable at the time of your visit. https://www.parks.vic.gov.au/-/media/project/pv/main/parks/documents/management-plans/mount-arapiles-tooan-state-park/mount-arapiles-tooan-state-park---aboriginal-cultural-heritage-protections---october-2020.pdf
Bird Nesting September-December Raptors usually nest on the following climbs in Spring : Cassandra, Eurydice, Harlequin Cracks, Revelations. Nesting usually finishes mid-December. There may or may not be signs in place at these times. Please keep 50m clear of these climbs if there appears to be nesting activity.
State Park - no dogs. No fires allowed Oct-Apr (inclusive).
ethic
Mount Arapiles is first and foremost a trad climbing area. The few sport climbs tend to be in the higher grades where no natural pro is available.
Bolting, particularly retro-bolting, is discouraged and should only be undertaken after extensive consultation with the local climbers, first ascensionists, etc. Inappropriately placed bolts have been chopped.
Do not chip the rock.
Look after the park.
| Route | Grade | Style | Selected ascents | |||||
|---|---|---|---|---|---|---|---|---|
| 1 |
Artemis
Starts at Siren’s first belay.
FA: Pete Holmes, Jack Jane & Colin Hoad, 2 Jun 2017 | 12 | 80m, 2 | |||||
 |
||||||||
| Route | Grade | Style | Selected ascents | |||||
| 2 |
★★★ Siren
A wonderful long classic, climbed at the same time as Introductory Route. A remarkably well-conceived line, it culminates in a magnificent final corner. Start as for Introductory Route, on the right side of the Tiptoe Ridge buttress, about 10 metres right of a major corner (Ordinary Trees), where two detached blocks are sitting just off the ground. There's an overhang about 6 metres up and a large dead tree marking the top of the pitch.
From here either walk off left along terrace and scramble up little gully and wall to top or climb little right-facing corner just left of final belay. This is grade 11. FA: Greg Lovejoy & Steve Craddock, 1963 | 9 | 150m, 5 | |||||
| 3 |
★★★ Siren Direct Finish
Definitely the best way to climb Siren, especially as it only has one move at grade 12 and creates one of the best easy corner pitches anywhere!
FA: Ian Guild & Doug Hatt.., 1964 | 12 | 180m, 5 | |||||
| 4 |
★ Siren Left Wall
The left wall of the 'Siren' corner is very obvious but is not quite as good as it looks. The old bolts need replacing. FA: Peter Jackson & Chris Baxter, 1965 | 15 | 30m, 2 | |||||
| 5 |
★★ Xena
Start: Start at the right edge of the Pinnacle face below right-leaning flake/crack, about 10 metres right of 'Siren'.
FA: Simon Mentz & Glenn Tempest | 10 | 110m, 4 | |||||
| 6 |
★★ Tales of Brave Ulysses
A good finishing pitch. Often done as a finish to 'Creon' but can be easily reached via the ledge system the crosses the face at 60 metres. FA: Gordon Talbett & Keith Egerton, 1978 | 18 | 40m | |||||
| 7 |
★★ Tauraroa
Follows the chimney-corner bounding the left edge of the left Watchtower face after starting up Hot Flap's first pitch, then the chimney-gully forming the left side of the Siren buttress. FA: John Bennett & MUMC team. 1960s, 2000 | 9 | 120m, 4 | |||||
2. Index by grade
| Grade | Stars | Name | Style | Pop | |
|---|---|---|---|---|---|
| 9 | ★★★ | Siren | 150m, 5 | ||
| ★★ | Tauraroa | 120m, 4 | |||
| 10 | ★★ | Xena | 110m, 4 | ||
| 12 | Artemis | 80m, 2 | |||
| ★★★ | Siren Direct Finish | 180m, 5 | |||
| 15 | ★ | Siren Left Wall | 30m, 2 | ||
| 18 | ★★ | Tales of Brave Ulysses | 40m |