A Crag Guide gives an extensive view of all sub areas and climbs at a point in the index. It shows a snapshot of the index heirachy, up to 300 climbs (or areas) on a single web page. It shows selected comments climbers have made on a recently submitted ascent.
At a minor crag level this should be suitable for printing and taking with you on a climbing trip as an adjunct to your guidebook.
This guide was generated anonymously. Login to show your logged ascents against each route.
Warning
Rock climbing is extremely dangerous and can result in serious injury or death. Users acting on any information directly or indirectly available from this site do so at their own risk.
This guide is compiled from a community of users and is presented without verification that the information is accurate or complete and is subject to system errors. By using this guide you acknowledge that the material described in this document is extremely dangerous, and that the content may be misleading or wrong. In particular there may be misdescriptions of routes, incorrectly drawn topo lines, incorrect difficulty ratings or incorrect or missing protection ratings. This includes both errors from the content and system errors.
Nobody has checked this particlular guide so you cannot rely on it's accuracy like you would a store bought guide.
You should not depend on any information gleaned from this guide for your personal safety.
You must keep this warning with the guide. For more information refer to our:
Usage policy
Contributors
Thanks to the following people who have contributed to this crag guide:
Brian Cork
Simmo
Brendan Heywood
Joe Goding
Joshua Malherbe
Match
Will Vidler
Gavin
Richard Pattison
Kai
The size of a person's name reflects their Crag Karma, which is their level of contribution. You can help contribute to your local crag by adding descriptions, photos, topos and more.
Some content has been provided under license from: © Australian Climbing Association Queensland (Creative Commons, Attribution, Share-Alike 2.5 AU)
Table of contents
- 1.
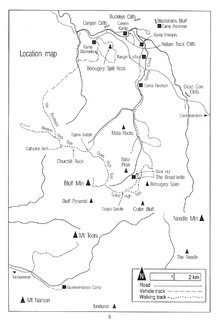
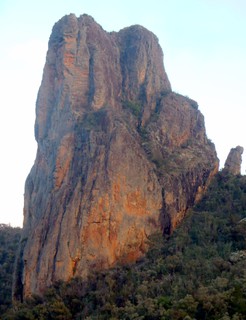
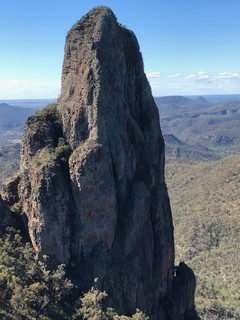
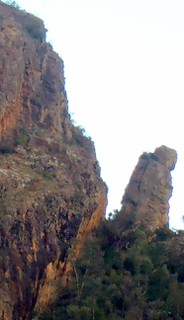
Belougery Spire
29 in Area
- 1.1. West Face 11 in Sector
- 1.2. North Face 13 in Cliff
- 1.3. South East Face 4 in Sector
- 1.4. Belougery Pinnacle 1 in Area
- 2. Index by grade
1. Belougery Spire 29 routes in Area
- Summary:
-
All Trad climbing
Lat / Long: -31.330787, 148.999573
description
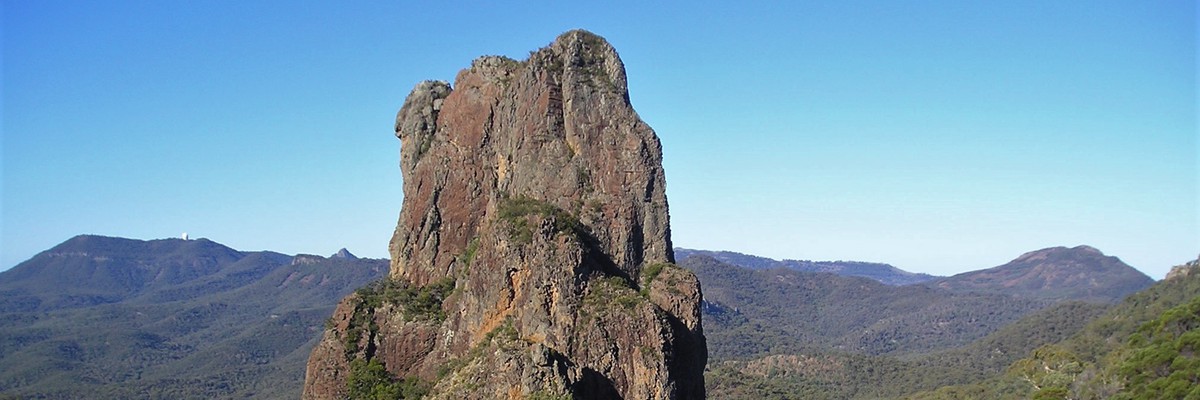
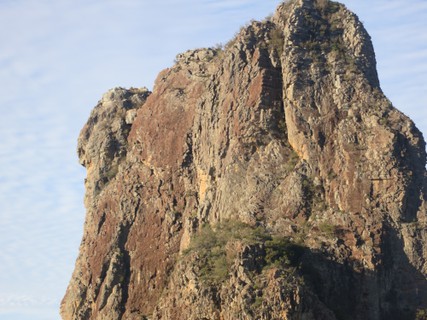
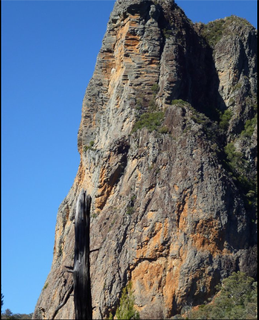
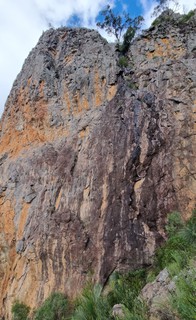
Belougery Spire is the first of many breath-taking rock features encountered en route to the Grand High Tops.
The climbs of Belougery Spire include both short and long routes, varying in grade from easy to more difficult, with the 'Warrumbungles factor' of route-finding adding to the difficulties.
access issues
If you have benefited from climbing infrastructure in NSW, please consider making a donation towards maintenance costs. The Sydney Rockclimbing Club Rebolting Fund finances the replacement of old bolts on existing climbs and the maintenance of other hardware such as fixed ropes and anchors. The SRC purchases hardware, such as bolts and glue, and distributes them to volunteer rebolters across the state of New South Wales. For more information, including donation details, visit https://sydneyrockies.org.au/rebolting/
approach
From Camp Pincham, follow the hiking trail to the Grand High Tops. From here, a vague track leads northeast following a ridge to the base of the spire. To get to start of climbs either scramble onto half-way ledge or walk down the left side or right side of the spire. One other, adventurous, option is to approach the spire's climbs from Hurleys Campsite.
Edit: July 2021 on descent we encountered the following anchors, one homemade hanger backed up with tat, two new chains then a decent sling on a tree, all less than 30m apart. Route down was clean and clearly marked. With double ropes it was possible to do one easy scramble, a 50m rap from the first chain anchor and one more easy scramble to finish descent. Entirely pleasant.
Descent from the spire can be quite serious. From the summit saddle, at the log-book container, scramble down to a boulder between the middle and south summits where there is a bolt with a home made hanger on it as well as a sling. From here you can abseil down on a single 60m (or scarily scramble) to a set of chains from which you can either abseil to a half way ledge with at least two 50m ropes or abseil to a rethread point with a single 60m and then down once more. From here you can then do some minor scrub bashing straight down to the end of the half way ledge and rap off some trees (unknown distance but definitely less than 50m). This will end you up right in the approach/exit gulley and you can walk off from here.
If walking off in the dark, it is advisable to stick close to the top of the ridge as it is an easy feature to follow and the bush is not very dense up there. If you do this you will eventually end up on the grand high tops walking track.
Many of the topo lines have been drawn from poor quality topos or from the descriptions. Please don't rely on them too heavily and update them once you have completed any of these routes, if required
 |
1.1. West Face 11 routes in Sector
- Summary:
-
Lat / Long: -31.330871, 148.999217
description
From the walking track that leads to Belougery Spire from the Grand High Tops, walk round W side of Belougery Pinnacle, then continue down beside W Face. Routes are also described from right to left (facing cliff).
West Face Direct Start and Missing You Marcelle provide an alternative approach to the Halfway Ledge, as opposed to the scramble approach.
approach
These routes start off the Halfway Ledge or the access to the ledge. The Halfway Ledge is the large, scrubby terrace half-way up the West Face of Belougery Spire. From the walking track that leads to spire, walk around the east side of Belougery Pinnacle, then scramble up a gully-chimney. Continue walking/scrambling left over easy rock and scrub down to base of water-worn gully. If the Spirit Moveth etc start in this area. To continue to Halfway Ledge, scramble up the gully. At the top of the gully turn left to reach starts of Vertigo, Endeavour Face and adjacent routes. A right turn at top of water-worn gully leads up a steep, vegetated gully to the base of Dr Dark's Chimney. Routes on the Halfway Ledge are described from left to right (facing cliff).
West Face Direct Start and Missing You Marcelle provide a direct start to the Halfway Ledge, as opposed to the scramble approach. They start on the access to the North West Face.
 |
||||||||
| Route | Grade | Style | Selected ascents | |||||
|---|---|---|---|---|---|---|---|---|
| 1 |
★★ Vertigo
A classic climb up a steep, exposed wall and slab on good rock. An excellent intro to climbing at the Warrumbungles. Can be climbed in two pitches. Scramble up to below the red-brown wall in middle of W Face, between prominent buttress and Abseil Gully (10 m L of Abseil Gully). Start just left of the 'V'
FA: Roger McDonald & Alex Hromas, 1961 | 10 | 95m, 4 | |||||
| 2 |
★★ Endeavour Face
Start 3 m L of Abseil Gully, below bulging rock.
FA: Adrian Cooper, Eric Hinder & Jon Wurth, 1971 | 14 | 80m, 4 | |||||
| 3 |
★★★ Tourist Traverse
The route of the original ascent of Belougery Spire by Eric Dark and Osmar White in 1932, interpreted from a description of the FA in Walkabout 1-4-36, which said'...one pitch is a three· hundred-foot traverse across the face of the mountain on a ledge from a foot to three feet wide, with sheer rock wall above and a drop of a thousand feet below'. This clearly describes pitches two and three of this route. Start: At the far right hand end of the Halfway Ledge below the obvious, vegetated gully. 1: 20m As for pitch one of Abseil Gully. Up corner/gully to chains on right. 2: 50 m Traverse left across the middle of the face on the big ledge (tending up at the end) and into the vegetated gully. 3: 40m At very end of ledge is a fine chimney, which leads to the famous 'Anti·Marilyn' squeeze hole. It is not really tight although presumably Marilyn couldn't do it. It is possible to climb around to the left of the squeeze hole too. 4: 20m Easy climbing to the summit. FA: Eric Dark & Osmar White, 1932 | 6 | 130m, 4 | |||||
| 4 |
Abseil Gully
Start: At the far right hand end of the Halfway Ledge below the obvious, vegetated gully.
FA: Unknown | 10 | 45m, 3 | |||||
| 5 |
Dr Dark's Chimney
This route was once thought to be Eric Dark's and Osmar White's original route to the summit. This is almost certainly not the case. However, since this route is already well known as Dr Dark's Chimney it is probably less confusing to retain this name as a tribute to Eric Dark's achievements in the Warrumbungles. From the top of the water-worn gully that leads to Half-way Ledge on W face, turn R up steep, vegetated gully. Many parties prefer to avoid this gully by climbing first two pitches of If the Spirit Moveth. 1-2: 60 m Scrubby gully on R, carefully, to large ledge at base of slabs leading up to chimney. Belay off bush. 3: 25 m Diagonally R up slabs to short crack. Crack to ledge below main chimney. 4: 35 m (crux) Chimney to where it opens out. Belay. Easy scramble to S summit. FA: unknown | 6 | 120m, 4 | |||||
| 6 |
No Birthdays on Pluto
Shares start of If the Spirit Moveth (same first two pitches), continues to Doctor Dark's Chimney belay ledge, then goes L of Doctor Dark's Chimney and up wall. Follow track to W Face. Continue along track behind detached pinnacle and scramble up first narrow gully to narrow ledge.
FA: Stuart Pengelly, Gary Caganott & Gary Caganoff, 1992 | 15 | 90m, 3 | |||||
 |
||||||||
| Route | Grade | Style | Selected ascents | |||||
| 7 |
★★ Peregrine
A fantastic varied crack high up on the west face of the spire. It provides a superb low(er) commitment but engaging approach to the south summit pinnacle on the spire. Excellent protection, clean rock and stellar crack climbing which all in one combo is a rarity in the Bungles. Stays in the shade till after midday (1 to 2pm ish in September). Start on the upper ledge system (above and south of the Vertigo ledges) reached via pitch 1 and 2 of Dr Dark's Chimmney (the scrubby gully accessed from the base of the Abseil Gully), or pitch 1 and 2 of If the Spirit Moveth (and No Birthdays on Pluto). Done as one 50-55m pitch to the summit. Start 10m right (facing in) from the slab pitch (pitch 3) of Dr Dark's Chimmney. From the broad ledge below the slabs, solo easy ground up and right to a good belay stance in the grassy recess below a chockstone belay. The finger crack through a small bulge (crux) can be seen 8m above. The crack eases and widens after the crux bulge and after 25-30m arches left to join Dr Darks Chimmney for the final 20-25m. Belaying once the Chimney is reached would also be an option. Led ground up by Rick with Peregrines buzzing about in magic conditions. Originally done in a combo with the first ascent of Fan Tail. When done as a combo with either Fan Tail, or Meet Me At The Crux, it provides an excellent contemporary and engaging route to the summit. The scrubby gully and halfway ledges provide easy access and bail options for lower commitment on shorter days. | 20 | 55m | |||||
| 8 |
If the Spirit Moveth
The following two routes, one a variant of the other have only vague route descriptions. They start at the top of the first gully that leads up to Halfway Ledge on W Face. The upper pitches of both climbs lie R of Doctor Dark's Chimney; the first follows a wall and a rib, the second a gully. Start where access track reaches SW Arete.
Attributed by Bryden Allen in 63 to Davis and Pettigrew. Description is from an earlier, more detailed record. FA: Graeme Mitchell, John Drummond & Warren Little, 1959 | 8 | 150m, 5 | |||||
| 9 |
★ If the Spirit Doesn't Moveth
One of many variants on If the Spirit Moveth. Variants are possible up to the foot of Dr Dark's Chimney, and from there on to S Face. A better description might read 'Up SW Arete to foot of Dr Dark's Chimney. Traverse R to face. Up'. Start above access gully on SW Arete.
FA: John Pickard & G Rosie, 1966 | 11 | 150m, 6 | |||||
| 10 |
West Face Direct Start
This route and Missing You Marcelle provide a direct start to the upper Halfway Ledge at the base of Vertigo, as opposed to the scramble approach up the lower part of the Abseil Gully. While the previous description suggested the route starts from ground level, it is more likely that it starts at the top of the large lower (first) main vegetated ledge that is reached after the scramble up and over from Belougary Pinnacle as per the access to the Halfway Ledge. They likely climb the wall left of the water-worn gully below the Halfway Ledge and Vertigo. During a new route ascent on the lower west face (from ground level) no bolts or easy grade 10 lines from ground level were found which indicates the higher start. Start somewhere left of the beginning of the water worn gully used to scramble up used to access the Halfway Ledge, the Abseil Gully and Vertigo.
Finish up route of choice. The topo line is a guess. Please update this if you confirm it. FA: Bryden Allen † & Wes Kilham, 1964 | 10 | 45m, 2 | |||||
| 11 |
Missing You Marcelle
Excellent climbing. Start as for West Face Direct Start. Steeply L up line of steps to old bolt, then R to stance. Wall above to tree belay. The topo line is a guess. Please update this if you confirm it. FA: Neale Smith & Bruce Cameron, 1993 | 15 | 45m | |||||
1.2. North Face 13 routes in Cliff
- Summary:
-
Lat / Long: -31.330336, 148.999564
description
From the walking track that leads to Belougery Spire from the Grand High Tops, walk round W side of Belougery Pinnacle, then continue down past the W Face and around the corner to the N Face. Routes are also described from right to left (facing cliff).
   |
||||||||
| Route | Grade | Style | Selected ascents | |||||
|---|---|---|---|---|---|---|---|---|
| 1 |
★★ Fan Tail
An excellent modern style trad route up a series of unlikely features through a steep, intricate and pumpy weakness. Very different more sporty climbing compared to most other rock on the spires. Might be one star at present as it still has lots of loose rock on it after the first ascent. However, after a good clean on abseil or more ascents, it will offer solid and superb rock. Protection is fiddly and intricate to place but entirely adequate with modern tactics. Long slings and double ropes are essential. Med RPs, full rack plus double cams up to BD/WildCountry(WC) No.1, critical micro cams (WC 0.1 to 0.2). Led ground up by Simmo with 1 rest below the crux, after all the obvious foot and hand holds kept breaking off ! Shares the same start as More Than a Pretty Face and Meet Me At The Crux. Start at ground level at a small right-leaning overlap about 80 m down the scree gully and overhung blocky wall that extends from Belougery Pinnacle. This is where the orange and grey stone on the left meets water-streaked black and white blocky stone under the lowest point of the Vee emerging from the first large vegetated ledge on the spire. Breach the overlap going left through a small ledge where a grass tree (Xanthorrhoea) is growing (sneaky good 0.5 WC cam), with delicate and committing moves to pull into the bottom grooves of More Than a Pretty Face, med bomber RP and 0.75 WC higher up. Begin an intricate right traverse across the black and white blocky water-streaked rock to gain a small corner below rooflet. Excellent but fiddly wires and micro cams. Treat all footers and hand holds with much caution until it gets more cleaned up. Sort out more excellent but intricate wires and micro cams from the corner, then commit to the cryptic and pumpy crux through the rooflet, then trend back left over the pumpy bulge, bomber micro cam, to strenuously gain a finger crack and easier ground. Re-compose and follow the line of least resistance trending slightly right up the divine and still thought-provoking, water-worn stone to the lowest part of the Vee of the large lower vegetated ledge. Good wires and med cams. | 20 | 48m | |||||
| 2 |
★★ Meet Me At The Crux
Another excellent contemporary style route added by Simm_o and Rick during 2022. Led onsight ground up. P1 Rick, P2 Simm_o. Follows a series of funky grooves and cracks on the lower pitch to a steep bulging and exposed finger crack on the upper pitch with easier corners and face climbing to the top. Double standard rack. Double ropes reccommended. Currently marred by some appalling rock and dicey but easy moves at the beginning of pitch 2. However, after a further clean on abseil (and potentially but not necessarily a bolt), it will offer excellent climbing up a strong line. Start as for 'More Than a Pretty Face' and 'Fan Tail'. P1 grade 20, 25 m - After gaining the beginning of the grooves shared by 'More Than a Pretty Face', follow the first groove and crack up then step delicately right into a trench above and right (take care on some still loose rock). Good med cams and wires. More delicate moves to exit up and left out of the trench onto easier ground. Up to belay ( small/med cams and wires) on the right end (facing in) of an orange ledge next to the righthand of two small figs. P2 grade 20, 40 m - From the belay move delicately along the (at present very loose blocky) ledge and balance up to place a decent high small wire just up and right of the second fig. Step back down off the ledge and gingerly but easily hand traverse left across precarious loose blocks and poor pro to the end of the ledge. More easy but dicey moves up to gain bomber gear in the start of the finger crack proper. Follow the finger crack (crux) 8m through a series of exposed bulges and balancy moves with excellent small wires and cams, to pull over a final bulge to a rest. Follow the easier well protected corners up until a rooflet caps the last corner. Escape the roofs to the right by a committing step right onto the face (great small/med cams) then up another 20m over easier well protected ground trending slightly right to belay stances where the buttress rounds over into the large vegetated gully. | 20 | 80m, 2 | |||||
| 3 |
More Than a Pretty Face
An appealing line with quality climbing. Start on the lower West Face (below the Halfway Ledge), about 2/3 way down the scree descent towards Pegasus and 60m right of that route.
[The topo line may be incorrect. Please update it]. FA: Ian Brown & Greg Croft, 1994 | 19 | 120m, 4 | |||||
| 4 |
★ Pegasus
Goes up the north west buttress for about 150m to the terrace, then takes a line between the upper part of Scunge Gully and Vertigo. Start: The first obvious entry to the cliff on the way down from the pinnacle to the start of Scunge Gully i.e. roughly 30 metres right of Scunge Gully.
FA: David Witham & J Willis, 1967 | 15 | 260m, 10 | |||||
| 5 |
★★ Caucasus Corner / Pegasus Link up
If you want to do the Quality crux pitch of Caucasus Corner and skip the loose blocks above then this is the route for you. After Pitch 5 on the large green ledge walk 50m north to the join Pegasus's last two pitches. | 17 | 260m, 7 | |||||
/5e/15/5e1535f2dcb24f17ebdc551105db8d80572a994f) |
||||||||
| Route | Grade | Style | Selected ascents | |||||
| 6 |
★★★ Caucasus Corner / Prometheus Bound
Start about 30m right of Scunge Gully.
When at top there is a 10m abseil into gully then one more short scramble/pitch to true summit. FA: John Lawrence & David Witham, 1965 | 17 | 330m, 12 | |||||
| 7 |
★★ Caucasus Corner Direct
Where CC moves left out of the corner buckle up and blast straight up the line and overlaps above past 4(?) well spaced fixed hangers and trad. On an earlier attempt pre bolts the leader fell 30m to land largely unharmed (physically at least) on the slabs below the belayer. He then promptly gave up climbing! The other half of the party returned, placed minimal hardware and finished the job. FA: Pat Spiers & Mark Rewi | 22 | ||||||
| 8 |
★ Stegosaurus
Start midway between Scunge Gully and Caucasus Corner, below buttress.
[The topo line may be incorrect. Please update it]. FA: Ian Brown & Greg Croft, 1993 | 17 | 150m, 5 | |||||
| 9 |
Scunge Gully
One of the longest climbs in the 'Bungles. A good deal harder if the final chimney can't be squeezed! Start: Above the scunge (in the centre) of the north face, up scrubby gully, to chimney leading right.
FA: Bryden Allen † & Ted Batty, 1963 | 15 | 320m, 15 | |||||
| 10 |
★★★ Napawi
Pleasant and varied.
[The topo line may be incorrect. Please update it]. FA: Ian Brown & Greg Croft, 1993 | 16 | 270m, 8 | |||||
| 11 |
The Mudgee Mail
Rattles around a bit but eventually gets there. Starts as for Scunge Gully and finishes on Out and Beyond.
6-7) 80m As for Out and Beyond. Rising traverse up right towards wide corner, back left to pitons on ledge below left end of overhang, traverse left below overhang into groove and up. [The topo line may be incorrect. Please update it]. FA: Greg Croft & Ian Brown, 1994 | 16 | 300m, 7 | |||||
| 12 |
★★ Out and Beyond
Magnificent. Start at the lowest point of the face, under prominent pinnacle. Easy slabs lead up 60m to a prominent pinnacle.
[The topo line may be incorrect. Please update it]. FA: Bryden Allen † & Ted Batty, 1962 | 15 | 250m, 9 | |||||
| 13 |
★★ Out and Beyond Direct Finish
The corner system on Out and Beyond, pitch six. 6a) 27 m Crack-corner. 7a) 48 m The line. FA: Paul Caffyn & Rick White, 1969 | 14 | 75m, 2 | |||||
1.3. South East Face 4 routes in Sector
- Summary:
-
Lat / Long: -31.331052, 148.999691
description
From Grand High Tops walking track, walk round E side of Belougery Pinnacle to E Face. Routes are listed from left to right (facing cliff).
 |
||||||||
| Route | Grade | Style | Selected ascents | |||||
|---|---|---|---|---|---|---|---|---|
| 1 |
East Face Route
Start: Scramble down about 60 m from Belougery Pinnacle to the large right-tending, vegetated, rising ledge system below a steep orange wall. The original route started from the ground about 100 m down from the Pinnacle but given the poor rock quality low down it is easier (and better) to traverse in on the ledge to what was the original start of Pitch 5. Scramble or climb 100 m or so up and over the top of the ledge to the base of the huge right leaning corner system.
[The topo line may be incorrect. Please update it. In fact, it isnt even clear if it goes to the summit ridge on the left or right at the end...]. The length of the route seems too short too. The original first three pitches are described below but there are many variations to access the main corner system if you choose this direct option.
FA: C lvin, B Montgomery & P Griffiths, 1958 | 10 | 150m, 5 | |||||
| 2 |
Dank, Dark and Dirty
One of endless variants to gain the main, upper corner system if you start on ground, rather than the main ledge. Start 10m right of the East Face Route (original start). Dark, mossy corner tending left; poor pro. Up to pocket, then up right. Now back left to join East Face Route at tree (original pitch 1 or 2). FA: Malcolm Haskins, Vaughan Andrews & Mark Janson, 1991 | 13 | 40m | |||||
| 3 |
(Unnamed)
As for East Face Route for 20 m, then rising traverse L across If The Spirit Moveth and finally across Doctor Dark's Chimney up high. [The topo line is a complete guess. Please update it]. FA: Paul Har & Derick Maeneke, 1991 | 12 | 300m | |||||
| 4 |
★ Hope lost, Hope found
Some contrived scrambling to an amazing chimney pitch with simple quality climbing to the top. Slight amounts of bushbashing. DO NOT DO WHEN WET, the chimney is dark and mossy and is probably unclimbable within a few days of serious rain, Otherwise good when dry.
FA: Joshua Malherbe & Nick Gresham, 9 Apr 2023 | 15 | 300m, 11 | |||||
1.4. Belougery Pinnacle 1 route in Area
- Summary:
-
Lat / Long: -31.331250, 148.998894
description
This is the pinnacle you come to as you approach Belougery Spire from the Grand High Tops.
| Route | Grade | Style | Selected ascents | |||||
|---|---|---|---|---|---|---|---|---|
| 1 |
Sculptor
Start on NW side of pinnacle (away from Belougery Spire). Up through small roofs. FA: J Croker & R Burek, 1976 | 17 | 30m | |||||
 |
||||||||